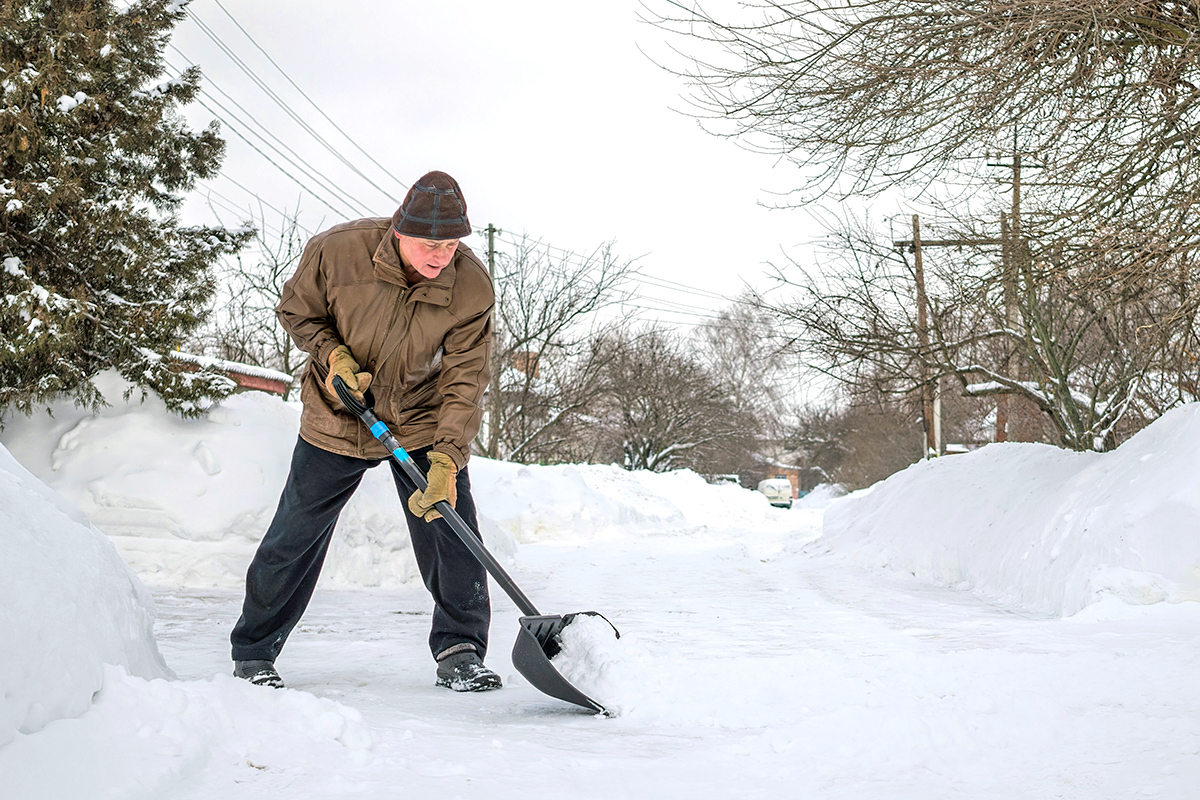
Advertisement
Gardening 3m read
0

Why You Should Never Throw Away Used Tea Bags

If you’re a tea drinker, you could have a gold mine on your hands. Old tea bags can come in handy if you’re looking to feed your houseplants for pennies. So, the next time you steep one, don’t toss it — you can turn it into nitrogen-rich plant food in just a few simple steps.

All featured products and deals are selected independently and objectively by the author. House Outlook may receive a share of sales via affiliate links in content.

If you’re a tea drinker, you could have a gold mine on your hands. Old tea bags can come in handy if you’re looking to feed your houseplants for pennies. So, the next time you steep one, don’t toss it — you can turn it into nitrogen-rich plant food in just a few simple steps.

How To Fertilize With Tea Bags

Start by collecting your old tea bags and storing them in a dry place. To help the tea bags dry faster, arrange them on a flat surface, such as a paper towel-lined plate or tray, making sure they don’t touch. You can speed up the drying process even further by placing them in the sun, near an open window or fan, or by warming them in the oven or microwave for a few minutes (see instructions below).

Related: How Milk Can Make Your Houseplants Shine
Quick-Drying Tea Leaves

To dry them in the oven, remove the tea leaves from their bags and spread them on a parchment-lined baking sheet. Set the oven to its lowest temperature and let the leaves bake for about an hour, stirring occasionally. If you’re using a microwave, place the loose leaves on a paper towel-lined, microwave-safe plate. Microwave the leaves in 30-second intervals, tossing them after each one. Repeat this step until the leaves are completely dry.

Advertisement

Once the tea bags are dry, cut off the tops so you can transfer the leaves into the soil. If you have a lot of plants to feed, consider dumping the tea leaves into a large bowl for easier access. Next, aerate the soil around your plant by scraping the top layer with a fork or gardening tool. For smaller plants, you can poke a few holes into the dirt with a chopstick or pencil. Finally, add a pinch of tea leaves to the soil, and use your hands or a tool to gently mix them into that top layer until everything is well blended.

If you have biodegradable tea bags and need to fertilize a large shrub or tree, there’s no need to empty them — just bury a handful of whole bags right into the dirt near the drip line (i.e., the outermost edge of the plant’s branches).

Plants That Love Tea Leaves

Since tea will make your soil more acidic, it’s important to use this hack only with plants that prefer a low pH. For indoor plants, this includes ferns and caladiums, as well as flowering varieties, such as fuchsias and camellias. If you’re taking your tea bags to the garden, consider adding them near the base of acid-loving shrubs like azaleas, rhododendrons, hydrangeas, and gardenias, and trees such as dogwood and Japanese maple.

Advertisement
Advertisement
Organizing 3m read
0

Hosting This Holiday Season? Free Up Fridge Space Fast

Expecting a house full of guests this holiday season? For many hosts, the more, the merrier. But while your home may be full of cheer, your fridge might be feeling the pinch. If you’re limited on fridge space but still want to prepare everyone’s favorite dishes for your holiday feasts, try this simple trick.

All featured products and deals are selected independently and objectively by the author. House Outlook may receive a share of sales via affiliate links in content.

Expecting a house full of guests this holiday season? For many hosts, the more, the merrier. But while your home may be full of cheer, your fridge might be feeling the pinch. If you’re limited on fridge space but still want to prepare everyone’s favorite dishes for your holiday feasts, try this simple trick.

Introduce Your Condiments to the Cooler

This trick is so simple, you’ll be kicking yourself for not thinking of it sooner. For instant fridge space, move all of your condiments from the refrigerator to an insulated cooler. This will immediately clear out room in your fridge doors and perhaps even a few shelves, depending on how saucy you like your meals. Once the condiments are in the cooler (using a two-to-one ratio of ice to items), simply move it to a spot out of the way. Now you can use that extra fridge space for whatever you need. Remember: Many condiments, including hot sauce, mustard, ketchup, soy sauce, and even store-bought mayonnaise, can be safely stored at room temperature, so move those right into the pantry if the cooler gets cramped.

More Ways To Make Room

Still need more space? Don’t sweat it — there are plenty of other ways to make room in your fridge. First, tackle oversized packaging by transferring items, such as lettuce or grapes, out of their bulky plastic cartons and into space-saving Ziploc bags. Next, check your produce: Some uncut fruits, including apples and oranges, can go from the crisper to the cupboard. (For reference, here is an extensive list of fruits that should and should not be refrigerated.)

Advertisement

Finally, if large liquid containers such as soda or juice are taking up valuable shelf space, try one of two tricks: Either buy smaller sizes the week you host, or pour them into water bottles. You can then store those bottles in the fridge doors to free up shelves for bigger dishes, such as turkeys, hams, casseroles, and pies. (Because the fridge door is subject to temperature fluctuations, avoid storing any perishable dairy items there.)

Related: The Secret to Effortless Hosting? These 12 Items

You don’t have to battle your kitchen just to pull off a festive get-together or a long weekend with your favorite visitors. Instead, get a little creative and use what you have on hand. 

Advertisement
Advertisement
Cleaning 3m read
0

Why You Should Clean Your Toilet With Ice

Many people use ice cubes to keep their beverages cool. So unless you’re a dog that drinks out of the toilet, it’s hard to imagine why you’d ever fill up the toilet bowl with ice. But there is one good reason, and it has nothing to do with staying hydrated. Some savvy individuals use ice cubes to clean their toilets, with surprising effectiveness. Let’s look at the science behind this strange (but true) bathroom cleaning hack.

All featured products and deals are selected independently and objectively by the author. House Outlook may receive a share of sales via affiliate links in content.

Many people use ice cubes to keep their beverages cool. So unless you’re a dog that drinks out of the toilet, it’s hard to imagine why you’d ever fill up the toilet bowl with ice. But there is one good reason, and it has nothing to do with staying hydrated. Some savvy individuals use ice…

Ice Ice Baby

Before we explain why it works, let’s talk about how easy it is to use this method. First, fill up the toilet bowl with enough ice cubes to go above the water line. Then, add whatever cleaning product you normally use, whether it’s a powder, liquid, or gel. Apply the cleaning product to the sides of the bowl, and then sprinkle or drizzle a bit of it over the ice as well. Let it sit for a few minutes (check the product label for the recommended time). If the ice melts too quickly, go ahead and add a few more cubes. Then, grab your toilet brush and move the icy slurry of cleaning fluids around the bowl for roughly 30 seconds.

Related: How To Keep Your Toilet Brush Germ-Free

Once you’ve finished scrubbing, flush the ice down the toilet. A word to the wise: Only use small cubes that can easily clear the trapway. Using crushed ice or cubes from a small ice tray should work just fine. Never use chunks of ice or oversized cubes that could potentially block or damage the drain pipe, or else you risk major plumbing issues.

Advertisement

The Cold, Hard Facts

Now that you know how to use this method, let’s discuss why it’s so effective. The idea is that ice slows the flow of liquid, which gives your cleaning product more time to stick to the sides of the bowl. Without the ice, the cleaner would quickly slip below the water line and dissolve, long before it could effectively break down any stains. The ice also acts as a mild abrasive while you scrub, helping to dislodge any grime.

By adding ice to the bowl, you make the cleaning product into a thick slurry that effectively coats the stains for a longer time. This allows the chemicals to work their magic before being flushed away. Plus, the cold temperature of the ice cools the bowl, which lessens unpleasant odors that may otherwise thrive in warm, humid environments.

Advertisement
Featured Image Credit:  wattanaphob/ iStock | Updated  Nov 11, 2025 |
Bennett Kleinman
Staff Writer
Bennett Kleinman is a New York City-based staff writer for Inbox Studio, covering topics for several brands including House Outlook and Better Report. He previously contributed to television programs such as "Late Show With David Letterman" and "Impractical Jokers," and digital publications like The Onion. Bennett is also a devoted New York Yankees and New Jersey Devils fan, and thinks plain seltzer is the best drink ever invented.
This article is for general informational purposes only.
Featured Image Credit:  wattanaphob/ iStock | Updated  Nov 11, 2025 |
Advertisement
Food & Drink 3m read
0

The Secret to Perfectly Crispy Pie Crusts

There’s nothing better than a homemade pie, fresh and warm from the oven. When you get it absolutely right, homemade pie crust is tastier than anything you can buy from a store. (We won’t get into the debate of lard versus shortening versus butter pie crust.) Unfortunately, even the best bakers occasionally struggle with getting that bottom crust nice and crisp, instead of limp and soggy. Sometimes it’s because you’ve made a mistake with your pie dough. But before you start second-guessing your recipe, try this simple baking technique to nip the problem in the bud.

All featured products and deals are selected independently and objectively by the author. House Outlook may receive a share of sales via affiliate links in content.

There’s nothing better than a homemade pie, fresh and warm from the oven. When you get it absolutely right, homemade pie crust is tastier than anything you can buy from a store. (We won’t get into the debate of lard versus shortening versus butter pie crust.) Unfortunately, even the best bakers occasionally struggle with getting…

For Perfect Homemade Pie, Lower the Rack

There’s a perfectly good reason why the bottom crust often falls short of perfection. Most pie fillings are either wet to begin with (looking at you, pumpkin) or release juices as they cook (peach pie, berry pies, or “Mom’s apple pie”). The goal is to get your crust nicely set and crisp on bottom before those liquids have a chance to soak in, making it soggy and flabby.

Related: The Baking Trick for Perfectly Flat Cake Layers

To do that reliably, you’ll need to harness a quirk of how ovens work. Most ovens, on most settings, heat primarily from the bottom. While the hot air naturally circulates slowly around the oven space — making the top and bottom heat relatively evenly on the middle rack — that changes when you move the pie. If you put your pie on the bottom rack, the pastry dough is exposed to heat from a much shorter range. This means your lower crust will brown and set more quickly and won’t get soggy.

Advertisement

A Few More Pointers for Better Results

You’ll usually want the top of your pie to set and brown as well, whether it’s a two-crust recipe or something like pumpkin pie, so don’t leave it on the bottom rack for the entire bake time. Instead, once the bottom crust is nicely browned (using a glass pie plate makes this easy to check), move it to the middle rack to finish baking.

For the bottom of a pie, high-fat shortcrust pastry resists sogginess better than flaky crusts do. Some bakers prepare a batch of each type in advance, divide them into portions, and freeze them for later use. That way, you can pull out separate top and bottom crusts, as needed, for your pie. If that sounds like too much work, you can also stack the deck by brushing your bottom crust with a beaten egg white and prebaking it for a couple of minutes. The egg white sets quickly, forming a protective moisture barrier. 

Advertisement
Featured Image Credit:  Taras Grebinets/ iStock | Updated  Nov 18, 2025 |
Fred Decker
Writer
Fred Decker is a trained chef and former restaurateur. Since closing his restaurants over a decade ago he has been a prolific freelance writer, publishing several thousand articles on dozens of high-volume websites including Taste Of Home, Hunker, Tasting Table, Week&, eHow, and GOBankingRates. He lives on a rural acreage shared with a big garden, chickens, rabbits, and grandkids.
This article is for general informational purposes only.
Featured Image Credit:  Taras Grebinets/ iStock | Updated  Nov 18, 2025 |
Advertisement
Gardening 2m read
0

How One Plastic Bag Can Boost Your Plants’ Growth

Achieving healthy, happy houseplants is all about finding the right amount of sunlight, nutrients, and a balanced watering schedule. Yet, even the most dialed-in routine won’t always result in thriving greens. If you want to truly boost your plants’ growth, a plastic bag might be the answer.

Achieving healthy, happy houseplants is all about finding the right amount of sunlight, nutrients, and a balanced watering schedule. Yet, even the most dialed-in routine won’t always result in thriving greens. If you want to truly boost your plants’ growth, a plastic bag might be the answer.

That’s right — a single plastic bag can actually create a microclimate that lets plants live their best lives, similar to a makeshift greenhouse.

Related: Why You Should Shower With Your Plants

Greenhouse on a Budget

Many of the houseplant varieties we know and love originate in tropical environments. Unless you live somewhere warm and humid year-round, there’s a good chance your plant babies aren’t getting enough moisture. While they appreciate their weekly watering, absorbing moisture from the air is another key way for them to nourish themselves. Humidity is essential because it opens up the leaf pores, allowing plants to better absorb the carbon dioxide needed for photosynthesis and, ultimately, grow more. Plus, high humidity helps keep concerns such as wilting or brown edges at bay.

Advertisement

If you want to supercharge plant growth, placing a transparent plastic bag over the plant can help trap humidity and create a makeshift mini greenhouse for better moisture levels. However, as with watering, balance is key. This trick works best on plants that receive indirect sunlight or prefer shade. Since the clear plastic traps heat, leaving the plant in direct sunlight intensifies the sun’s energy, ultimately scorching your plant instead of moisturizing it. While you can apply plastic bags to plants in sunny spots, you’ll need to put them on in the evening and remove them before the sun shines again.

In addition to tropical houseplants, this trick is great for sprouting plant seeds. Use it to grow a monstera or another popular houseplant from scratch, or to get your garden seedlings ready for the spring.

Advertisement
Featured Image Credit:  Alison Thompson/ Alamy Stock Photo | Updated  Nov 4, 2025 |
Jessie Quinn
Writer
Jessie Quinn is a Los Angeles-based lifestyle journalist with words published in PEOPLE, StyleCaster, Apartment Therapy, The Spruce, Byrdie, and more. She has a Bachelor's Degree in fashion journalism from Academy of Art University and her work spans across many categories, including style, beauty, home, health, crafts, and more.
This article is for general informational purposes only.
Featured Image Credit:  Alison Thompson/ Alamy Stock Photo | Updated  Nov 4, 2025 |
Advertisement
Cleaning 2m read
0

The Trick That Makes Red Wine Stains Disappear

Setting the table for a dinner party often involves spreading out a pristine white tablecloth. Of course, no sophisticated dinner party is complete without wine as well, even though mixing red wine and white linen is a disaster waiting to happen. But fear not, because even if someone accidentally knocks over a glass, there are ways to prevent stains from setting. Here’s a quick and easy way to make those red wine stains disappear.

All featured products and deals are selected independently and objectively by the author. House Outlook may receive a share of sales via affiliate links in content.

Setting the table for a dinner party often involves spreading out a pristine white tablecloth. Of course, no sophisticated dinner party is complete without wine as well, even though mixing red wine and white linen is a disaster waiting to happen. But fear not, because even if someone accidentally knocks over a glass, there are…

So Long, Red Wine Stains

After spilling red wine, many people resort to using baking soda, salt, club soda, or vinegar to clean up the mess. But those remedies usually fall short, leaving you with a lingering wine stain. In reality, the best way to get rid of those dark, red marks is to combine two basic cleaning products: liquid dish soap and 3% hydrogen peroxide.

Related: How To Keep Leftover Wine Fresh for Days

Immediately after wine is spilled, blot the stain with cold water to help dilute it. Be sure to blot instead of wiping from side to side; otherwise, you risk spreading the stain. Next, mix two parts liquid dish soap with one part 3% hydrogen peroxide and spread the mixture on top of the stain. Leave it to sit for roughly half an hour before either wiping it away with cold water or running it under a cold faucet. You should notice that the stain has largely, if not entirely, disappeared. If a faint outline remains, simply repeat the process.

Advertisement

A Word of Caution

There is one potential issue with this method, and it has to do with the bleaching properties of hydrogen peroxide. While this isn’t an issue for white fabrics, hydrogen peroxide can cause discoloration on colorful fabrics. Before using this cleaning method on colored fabrics, you should spot-test the solution. Apply a small amount to an inconspicuous area to see if the color changes. If the fabric’s color remains unchanged, you’re good to go and can proceed with cleaning the rest of the item.

Advertisement
Featured Image Credit:  Viktoriia M/ Adobe Stock | Updated  Nov 4, 2025 |
Bennett Kleinman
Staff Writer
Bennett Kleinman is a New York City-based staff writer for Inbox Studio, covering topics for several brands including House Outlook and Better Report. He previously contributed to television programs such as "Late Show With David Letterman" and "Impractical Jokers," and digital publications like The Onion. Bennett is also a devoted New York Yankees and New Jersey Devils fan, and thinks plain seltzer is the best drink ever invented.
This article is for general informational purposes only.
Featured Image Credit:  Viktoriia M/ Adobe Stock | Updated  Nov 4, 2025 |
Advertisement
Organizing 2m read
0

The Wrong Way To Store Serveware (And What To Do Instead)

When you’re the host with the most, stocking up on entertaining essentials is second nature. If your closet or cabinet is filled to the brim with salad bowls, serving platters, casserole dishes, cake stands, and cheese boards, you’ve likely experienced the unease of attempting to retrieve that one very delicate piece from the bottom of a large pile. But why risk shattering a family heirloom when there’s a better way to store serveware? Try this organizing hack to make your favorite entertaining pieces easier to find and more accessible.

All featured products and deals are selected independently and objectively by the author. House Outlook may receive a share of sales via affiliate links in content.

When you’re the host with the most, stocking up on entertaining essentials is second nature. If your closet or cabinet is filled to the brim with salad bowls, serving platters, casserole dishes, cake stands, and cheese boards, you’ve likely experienced the unease of attempting to retrieve that one very delicate piece from the bottom of…

How To Store Serveware

According to professional organizer and TikTok creator Andrea Wolf of Organize Detroit, there’s a right and wrong way to store your serveware. Stacking your entertainment pieces as high as your shelving allows isn’t the most efficient method. Not only can the pieces easily topple over, but this also makes it difficult to get what you need, when you need it.

Related: 5 Things You Can Declutter in 10 Minutes or Less

Instead, Wolf suggests stacking only three to four pieces together. This gives you easy access to each item, ensuring you can enjoy all your serveware equally. She also recommends adjusting the shelving in your entertainment closet, a process that’s fairly straightforward if your cabinet is equipped with pin holes (the vertical rows of evenly-spaced holes drilled into the cabinet sides). Wolf says it’s better to have less vertical space between the shelves to accommodate smaller stacks, even if it requires installing extra shelves. If your shelves are fixed, however, you can use shelf risers to achieve the same level of organization.

Advertisement

Store Like With Like

When it comes to storing entertainment essentials, the professional organizer offers one more piece of advice: Organize like pieces together. This means keeping platters with platters, bowls with bowls, and trays with trays. Following this rule makes it even easier to sort through your collection and quickly find what you need.

Advertisement
Advertisement
Decorating 3m read
0

How To Turn Plain Taper Candles Into Statement Pieces

Taper candles are a timeless tablescape detail, elevating everything from your Thanksgiving feast to your birthday party buffet. Despite their classic status, these stick-shaped candles have recently received a trendy touch, thanks to a few viral TikTok videos. Instead of plopping plain candlesticks into a candelabra, crafters are now zhuzhing up their candles with paint (and, occasionally, melted wax in various hues) to add motifs for a more decorative and personalized feel.

All featured products and deals are selected independently and objectively by the author. House Outlook may receive a share of sales via affiliate links in content.

Taper candles are a timeless tablescape detail, elevating everything from your Thanksgiving feast to your birthday party buffet. Despite their classic status, these stick-shaped candles have recently received a trendy touch, thanks to a few viral TikTok videos. Instead of plopping plain candlesticks into a candelabra, crafters are now zhuzhing up their candles with paint…

If the thought of breaking out the paint set or working with melted wax feels a little intimidating, don’t worry — we found a surprisingly simple way to recreate the style. In a TikTok video, creator @ranialaluna shared how to achieve that trendy painted candle look using — get this — temporary tattoos.

Related: A Quick Fix for Leaning Taper Candles

(Temporary) Tattoo Your Tapers

Creating these DIY faux-painted candlesticks is as easy as sticking a temporary tattoo onto your skin. Start by selecting your preferred designs and cutting out each motif individually. This makes the application process much easier and allows you to customize the placement. Next, take one tattoo and wrap it around the candlestick exactly where you want it. Just as you would on your skin, use a damp cloth or paper towel to gently press on the tattoo for 30 seconds. Once the temporary tattoo is set, peel away the backing to reveal the transferred design. Follow these steps with the remaining tattoos until the candlestick is covered to your liking.

Advertisement

Sheets for Every Season

This project is a fun way to add a small detail to your table or holiday decor — it even makes for a great DIY gift idea.

• For fall festivities, go with colorful leaf motifs, classic Thanksgiving themes, or these mini Halloween tattoos to recreate @ranialaluna’s spooky designs.

• For winter holidays, consider a festive Christmas or New Year’s Eve pack, or some sparkly snowflakes.

• In the spring, opt for whimsical flower designs or beautiful butterfly tattoos.

• Come summertime, try a playful seashell sheet or a variety of mini tattoos for a “sticker sleeve” effect.

Tip: Take this craft to the next level by designing your own temporary tattoos using special printer paper

Advertisement
Featured Image Credit:  Andrej Lišakov/ Unsplash+ | Updated  Nov 4, 2025 |
Jessie Quinn
Writer
Jessie Quinn is a Los Angeles-based lifestyle journalist with words published in PEOPLE, StyleCaster, Apartment Therapy, The Spruce, Byrdie, and more. She has a Bachelor's Degree in fashion journalism from Academy of Art University and her work spans across many categories, including style, beauty, home, health, crafts, and more.
This article is for general informational purposes only.
Featured Image Credit:  Andrej Lišakov/ Unsplash+ | Updated  Nov 4, 2025 |
Advertisement
Gardening 3m read
0

Why You Should Shower With Your Plants

Many of the most popular houseplants originate from warm climates. These tropical plants tend to grow lush, dramatic foliage for year-round interest; if you want winter-blooming houseplants, they’ll almost always come from someplace warm. But here’s the thing: Tropical plants really, really love humidity, and indoor humidity is an issue. Most of us don’t keep our houses at steamy, muggy, tropical levels, which our plants would love but we would hate. So here’s a happy compromise: Think about taking your plants into the shower.

Many of the most popular houseplants originate from warm climates. These tropical plants tend to grow lush, dramatic foliage for year-round interest; if you want winter-blooming houseplants, they’ll almost always come from someplace warm. But here’s the thing: Tropical plants really, really love humidity, and indoor humidity is an issue. Most of us don’t keep…

Why Showering Is Great for Indoor Tropical Plants

Just to be clear, we’re not suggesting you literally haul a few pots into the shower while you’re lathering up. But the shower does provide a great opportunity to give your tropicals a “spa day,” especially in winter when the air tends to be driest (and challenging low humidity is the norm).

Related: Why You Should Bring an Orange Into the Shower With You

Gather an armful of plants and put them in the shower, then turn on the water. If you have a handheld shower head, you can use it to wash each plant for a few moments, which not only removes dust (dust blocks the light plants need for photosynthesis) but also flushes away any possible pests. As each plant is thoroughly cleaned and watered, set it aside and move on to the rest. When you’re done, turn off the water, close the shower curtain or door, and give them a half-hour or longer to revel in the enclosed, warm, steamy space while their soil drains. (Tip: Only attempt this hack with houseplants that are in containers with drainage holes.)

Advertisement

The Benefits of Giving Your Tropical Plants a Shower

There are lots of other humidity-boosting hacks for your plants, but none works this powerfully. A steamy shower is the closest thing to genuine tropical heat and humidity, so even an hour once a week will give your plants the conditions they need to truly thrive. Other benefits include deterring spider mites, which like dry conditions, loosening compacted soil with a thorough watering, and rinsing out accumulated salts from fertilizer and watering. (If you have hard or softened water, rinse them well with distilled water instead of tap water.)

If you have a large walk-in shower or a wet room, you can even keep a few select humidity-loving plants right in the shower itself. For the rest of us, a windowsill or ledge in the bathroom (or just outside it) is almost as good, provided space and lighting permit.

Advertisement
Featured Image Credit:  Ольга Симонова/ iStock | Updated  Nov 4, 2025 |
Fred Decker
Writer
Fred Decker is a trained chef and former restaurateur. Since closing his restaurants over a decade ago he has been a prolific freelance writer, publishing several thousand articles on dozens of high-volume websites including Taste Of Home, Hunker, Tasting Table, Week&, eHow, and GOBankingRates. He lives on a rural acreage shared with a big garden, chickens, rabbits, and grandkids.
This article is for general informational purposes only.
Featured Image Credit:  Ольга Симонова/ iStock | Updated  Nov 4, 2025 |
Advertisement
Food & Drink 2m read
0

Never Overbake Cookies Again With This Tip

Walking into a gathering with a freshly baked batch of cookies is a no-brainer, especially during the holiday season. But achieving the perfect cookie is trickier than it sounds. As any home baker knows, while the ingredients and mixing process are pretty straightforward, the perfect cookie texture is surprisingly elusive. This is because pinpointing exactly when to take them out of the oven is difficult. Most recipes list a specific number of minutes, but baking is a precise science, and outside factors — such as individual oven temperature — play a big role. On top of this, everyone has a strong opinion on exactly how soft, chewy, or crispy a cookie should be, making it hard to know whose advice to follow. How exactly should the cookies look when they emerge from the oven?

Walking into a gathering with a freshly baked batch of cookies is a no-brainer, especially during the holiday season. But achieving the perfect cookie is trickier than it sounds. As any home baker knows, while the ingredients and mixing process are pretty straightforward, the perfect cookie texture is surprisingly elusive. This is because pinpointing exactly…

Knowing When Your Cookies Are Done

That’s where this game-changing baking tip comes in. To determine the perfect time to take your cookies out of the oven, wait until the tops lose their wet, shiny appearance. This signals that the batter has set, as it’s no longer wet enough to reflect light. The cookies will still look very soft, but remember that cookies continue to bake on the sheet after they’ve been removed from the oven. Because of this process (called “carryover cooking”), cookies should look slightly underbaked when they exit the oven.

Related: Holiday Cookies Are Only Minutes Away With This Time-Saving Hack

If you still feel uncertain, you can combine this trick with other visual cues. Most reliably, wait until the edges of the cookies just start to turn golden brown. The key phrase here is “start to.” If the edges have been golden brown for some time, the cookies are most likely going to be overbaked.

Advertisement
Bonus Tip

If you want your cookies to look as good as they taste, try this: As soon as they come out of the oven, place a biscuit cutter or wide-mouthed glass over each one. Swirl it very gently to achieve perfectly round cookies. This motion smooths out any irregularities and shapes the cookies into neat-looking circles. Make sure you do this as soon as they come out of the oven, or they won’t be pliable enough.

Advertisement