Advertisement
Home Improvement 3m read
0

Stabilize Wobbly Furniture With These Easy Fixes

Realizing your chair or table is wobbly is maddening — especially if you’re in the middle of a meal. But this pesky problem doesn’t mean you need to go out and buy a whole new furniture set. There are easy fixes for wobbly furniture legs, and most of them are free or ultra-cheap.

All featured products and deals are selected independently and objectively by the author. House Outlook may receive a share of sales via affiliate links in content.

Realizing your chair or table is wobbly is maddening — especially if you’re in the middle of a meal. But this pesky problem doesn’t mean you need to go out and buy a whole new furniture set. There are easy fixes for wobbly furniture legs, and most of them are free or ultra-cheap.

A quick note before you begin: First, check to make sure your floor isn’t uneven. You can do this by moving the furniture around (if possible) and checking if it still feels unstable after being relocated. If moving the furniture does fix the issue, the culprit is most likely your floor, and you’ll need to contact a flooring professional. If you determine that the issue is the furniture itself and not the floor, here are three easy ways to wrangle the wobble.

1. Tighten the Hardware

Loose hardware is one of the most overlooked furniture issues, and yet it’s one of the most easily fixed. Check the screws on your furniture legs — do any of them feel loose? If the wobble is slight, you can most likely tighten the screws using a screwdriver. If the wobble is more pronounced, however, you may need to bust out the cordless drill and use a drill bit and epoxy to secure the screws.

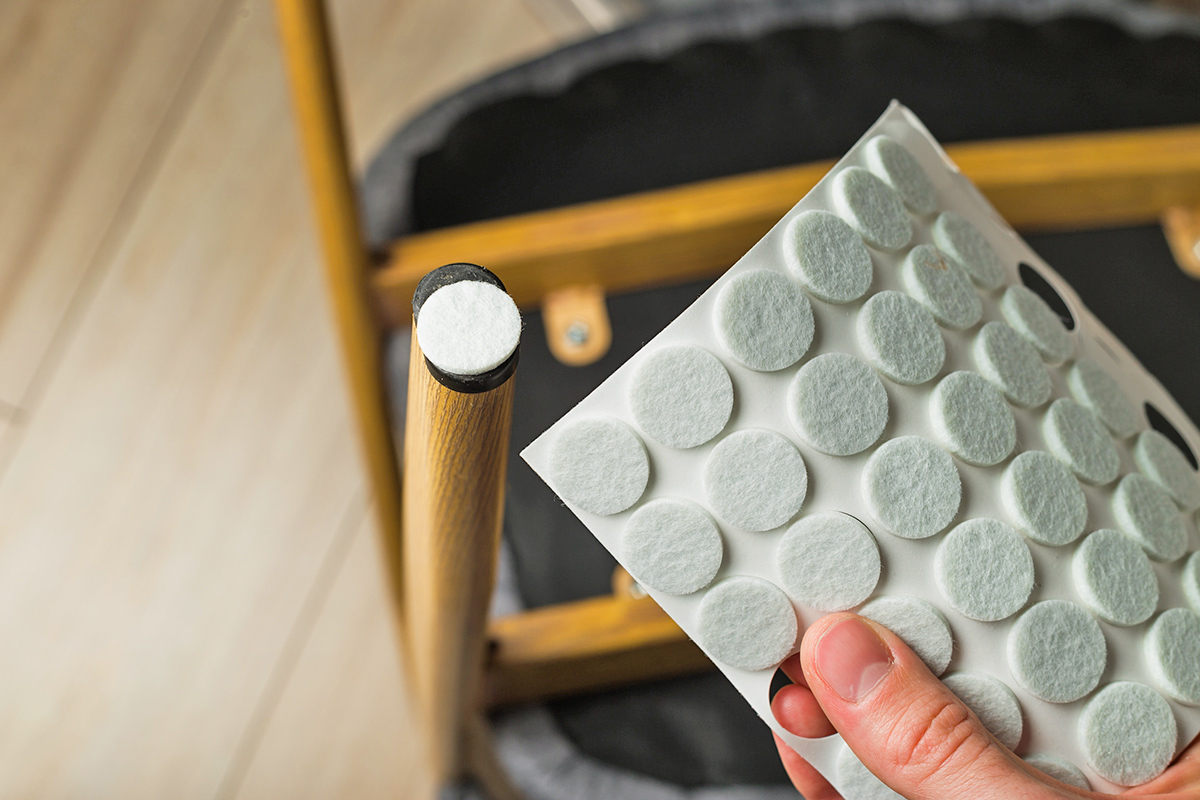
2. Add Furniture Pads

Furniture pads do double duty: They save your floors from scratches and they provide some much-needed stability to wobbly furniture legs. Ideally, you want pads on all of your furniture’s legs to protect your floor. But if scratching isn’t an issue, you can add a furniture pad to only the wobbly leg. You can also try adding pads to all nonwobbly legs, and two to three pads to the wobbly leg. Experiment with different numbers of pads to determine which combination yields the most stable results.

Advertisement
Related: 3 Ways To Make Sticky Drawers Slide Again

3. Use a Slice of Cork

Opt for this easy hack if you have extra wine corks lying around. Gently lift the wobbly leg until the whole piece of furniture is level. Now, measure the distance between the bottom of the wobbly leg and the floor. (If the gap is too small to measure, estimate the thickness with your fingers.) Next, use a utility knife or similar sharp knife to slice off a thin cork disc that is the same thickness as the gap you measured. Use wood glue or hot glue to attach the cork disc to the bottom of the furniture leg. Note: While both natural and synthetic corks work for this fix, a natural cork will degrade faster.

Advertisement
Advertisement
Cleaning 3m read
0

The One Habit That Saves Your Washer From Mold

Given that washing machines exist to make other objects clean, it makes sense that you’d want to keep them clean as well. That’s easier said than done, however, since there’s no such thing as a “washing machine washer.” Though these time-saving appliances are fairly low-maintenance when it comes to cleanliness, they do carry some risks, namely mold and unpleasant odors. The good news is that the fix is surprisingly easy.

All featured products and deals are selected independently and objectively by the author. House Outlook may receive a share of sales via affiliate links in content.

Given that washing machines exist to make other objects clean, it makes sense that you’d want to keep them clean as well. That’s easier said than done, however, since there’s no such thing as a “washing machine washer.” Though these time-saving appliances are fairly low-maintenance when it comes to cleanliness, they do carry some risks,…

When Is a Door Not a Door?

Washing machines spend the vast majority of their existence closed, which prevents airflow. As moisture develops inside, this enclosed space turns into a humid, dank environment perfect for growing mold. The problem is only compounded when you forget to take your clothes out as soon as you hear that instantly recognizable beep and they develop a musty scent after sitting for too long. To prevent all that unpleasantness, simply leave the door ajar between uses. If the open door gets in the way, aim to keep it unlatched for at least for a few hours after finishing each load.

Deep Clean

That’s not all you can do, of course. If you have a front-load washing machine, which is particularly susceptible to mold, you should pull out the detergent drawer and dry the rubber gasket with a microfiber towel after each use. For a deeper clean, mix 1 cup distilled white vinegar, 1 cup water, and 1 teaspoon liquid dish soap. Pour the solution into a spray bottle and coat the entire gasket, allowing it to sit for a few minutes. Then, use an old toothbrush to scrub any stubborn or tight spots, wiping away the grime as you go. Remember to rinse the gasket with clean water afterward to prevent potential damage to the rubber.

Advertisement
Related: The Only Laundry Setting You Need

Cleaning a top-load washing machine requires less elbow grease. Select the hottest water setting and the longest cycle (or largest load size). If available, use your machine’s “Clean Tub” cycle. As the water runs, add 4 cups of distilled white vinegar to the drum. Allow the machine to agitate briefly to mix in the vinegar, then stop the cycle. Let the vinegar soak for five minutes. Then, add 1/2 cup of baking soda and allow the agitator to resume. Stop the cycle again, and let the entire mixture soak for 30 minutes to an hour. Resume and complete the wash cycle.

Advertisement
Advertisement
Food & Drink 2m read
0

Is Your Baking Powder Still Good? Here’s How To Tell

If your cakes are mysteriously flat or your muffins refuse to rise, the culprit might not be your technique — it could be your leavener. Even if your baking powder box isn’t past its expiration date, it can still lose its rising power. As it turns out, baking powder begins to degrade once it’s opened, due to humidity, heat, and poor sealing.

If your cakes are mysteriously flat or your muffins refuse to rise, the culprit might not be your technique — it could be your leavener. Even if your baking powder box isn’t past its expiration date, it can still lose its rising power. As it turns out, baking powder begins to degrade once it’s opened, due…

A Simple, Foolproof Test You Can Do in Seconds

1. Scoop 1/2 teaspoon of baking powder into a small, heat-safe bowl.

2. Pour in 1/4 cup of boiling water.

3. Watch for the reaction: If it fizzles and bubbles energetically, the powder is still active and safe to use. If the reaction is muted or nonexistent, the powder is “dead” and should be discarded.

Related: Get Room-Temperature Eggs in Minutes With This Baking Hack

Why This Matters

Baking powder is what helps your cakes, quick breads, pancakes, and muffins rise, resulting in a light and fluffy texture. When it’s inactive, the result is heavy, dense, or flat baked goods. You might find yourself wondering why your recipe failed, even after you followed it precisely. Many home bakers overlook this step and assume they made a mistake rather than checking an ingredient that’s lost its punch.

Advertisement

Storage and Longevity Tips

• Once opened, keep your baking powder in a cool, dry place. Heat and moisture are its enemies.

• Close the lid tightly after each use to minimize moisture entry. You can also place the container in an airtight food storage bag to ensure freshness.

• If you don’t bake often, test the powder before you start mixing up that special batch.

• If the “use by” date hasn’t passed, but you still see minimal fizz in the test, toss the container and buy a fresh one.

By making the fizz test part of your prep routine, you’ll add one more layer of quality control to your baking. A little effort now means no surprises later. No flat cakes, no disappointment — just beautiful rising and light textures every time.

Advertisement
Featured Image Credit:  Rachel Husband/ Alamy Stock Photo | Updated  Dec 2, 2025 |
Jill Layton
Writer
Jill Layton started writing professionally when she realized her emails and texts were kinda funny. She’s an affiliate shopping writer and lifestyle contributor for Scary Mommy, Bustle, Mic, and Best Products. She’s the mom of two alarmingly witty kids and the world’s most perfect dog.
This article is for general informational purposes only.
Featured Image Credit:  Rachel Husband/ Alamy Stock Photo | Updated  Dec 2, 2025 |
Advertisement
Gardening 3m read
0

3 Signs Your Plant Needs a Bigger Pot

When people become parents, they often start looking for a bigger living space. A similar phenomenon occurs among “plant parents”: A time will come when our cherished plants become rootbound, requiring us to repot them into larger living spaces.

When people become parents, they often start looking for a bigger living space. A similar phenomenon occurs among “plant parents”: A time will come when our cherished plants become rootbound, requiring us to repot them into larger living spaces.

Periodic repotting is standard practice when you have indoor plants, so learning how to do it (and, more importantly, when) is crucial to long-term plant health and success. Here are three unmistakable signs that your plant needs a larger pot.

1. Your Plant Stops Growing

While some plants grow slowly, and others quickly, you should consistently see new growth as time passes. If a once-vigorous plant slows down dramatically, or if its new growth looks small or sickly compared to what you’ve seen in the past, it’s probably time to repot.

Related: 20 Essential Hacks Every Plant Parent Needs To Know

2. Your Plant’s Water Needs Increase

Watering is essential for every plant, even desert succulents, though overwatering is always a risk when you’re a houseplant novice. (Don’t worry, you can often save them.) Getting to know your plants’ specific watering needs and watering only when necessary is an important step on your growing journey. Yet, even after you’ve mastered their quirks, you may find that some plants suddenly need more frequent waterings. That shift is a telltale sign that their root growth has taken up most of the pot’s available space.

Advertisement

3. The Soil in Your Pot Is Crusty and White on Top

Over time, you’ll start to see crusty deposits building up at the top of the soil. These deposits are salts, introduced through your tap water or your choice of fertilizer. They’re a sign that the soil needs renewing, often because your plant’s roots are taking up so much of the pot. In this case, when you’re potting up your plant, be sure to scoop out as much of the old soil as possible (without damaging the roots) and replace it with fresh soil.

When Not To Pot Up Your Plants

There are a few times when it’s not appropriate to repot your plant. Some plants, for example, do best when they are slightly rootbound. Also, some species can become too large for your space if continually repotted. For those plants, your better option is to periodically prune the roots, replenish the container with new soil, and place the plant back into the same pot. If your plant is already top-heavy, instead of potting up, consider switching to a heavier or wider pot (for more stability) that holds the same quantity of soil.

Advertisement
Featured Image Credit:  Ella Murphy/ Unsplash | Updated  Dec 2, 2025 |
Fred Decker
Writer
Fred Decker is a trained chef and former restaurateur. Since closing his restaurants over a decade ago he has been a prolific freelance writer, publishing several thousand articles on dozens of high-volume websites including Taste Of Home, Hunker, Tasting Table, Week&, eHow, and GOBankingRates. He lives on a rural acreage shared with a big garden, chickens, rabbits, and grandkids.
This article is for general informational purposes only.
Featured Image Credit:  Ella Murphy/ Unsplash | Updated  Dec 2, 2025 |
Advertisement
Food & Drink 3m read
0

You Don’t Need To Cook Chicken as Long as You Think

There are some foods that people tend to approach with an extra degree of caution, and chicken — despite being so popular — is one of them. There’s a good reason for that: Most of the chicken in our food supply comes from large factory farms, where conditions are prime for the spread of common pathogens, such as salmonella or listeria. In fact, in October 2025, shortly before this article was written, nearly 5 million pounds of chicken products were recalled for potential listeria contamination.

All featured products and deals are selected independently and objectively by the author. House Outlook may receive a share of sales via affiliate links in content.

There are some foods that people tend to approach with an extra degree of caution, and chicken — despite being so popular — is one of them. There’s a good reason for that: Most of the chicken in our food supply comes from large factory farms, where conditions are prime for the spread of common…

While you might choose to ignore official temperature recommendations if you prefer a medium-rare steak or a soft egg, most of us are happy to accept the guidance on chicken. The USDA specifies that chicken should reach an internal temperature of 165 degrees Fahrenheit, but you may not need to cook your poultry as long as you think to guarantee food safety. Here’s why.

Cooking Chicken to a Safe Temperature

Here’s the thing about the USDA’s official temperature recommendations: They’re conservative by design, focusing on a temperature that will kill bacteria instantly. However, according to the USDA’s own guidance for commercial food producers, a lower temperature held for a longer time works just as well. For example, maintaining a temperature of 150 degrees Fahrenheit for exactly 52 seconds gives the same result. The problem is that food manufacturers have the resources to be that precise, and home cooks like us don’t. The good news is that we don’t have to.

Related: Want Tender, Juicy Chicken? Try This Easy Trick

That’s thanks to something called “carryover cooking.” When you remove a whole chicken (or a piece of chicken) from your stove, oven, or grill, a lot of heat is already trapped inside. This heat means the cooking process will continue, and the interior temperature will continue to rise. The bigger the cut, the more carryover cooking you’ll see. A whole chicken retains more heat than a leg quarter, which retains more heat than a boneless breast.

Advertisement

A Meat Thermometer Is Essential for Food Safety

So relax a little, and allow time for carryover cooking when preparing chicken. For a whole bird, you can safely pull it from the oven when the temperature hits 150 to 155 degrees Fahrenheit. For smaller cuts, 155 to 160 degrees Fahrenheit is a safe range. The only way to know for sure, however, is with an accurate meat thermometer. Check the temperature in a couple of places before you take the chicken off the heat, and then leave the thermometer in place while the meat rests for five to 10 minutes before serving. As long as the internal temperature stays at 155 degrees Fahrenheit or above (in the lowest-temperature part) for at least a minute or two, you’re golden.

Advertisement
Featured Image Credit:  Annie Spratt/ Unsplash+ | Updated  Dec 2, 2025 |
Fred Decker
Writer
Fred Decker is a trained chef and former restaurateur. Since closing his restaurants over a decade ago he has been a prolific freelance writer, publishing several thousand articles on dozens of high-volume websites including Taste Of Home, Hunker, Tasting Table, Week&, eHow, and GOBankingRates. He lives on a rural acreage shared with a big garden, chickens, rabbits, and grandkids.
This article is for general informational purposes only.
Featured Image Credit:  Annie Spratt/ Unsplash+ | Updated  Dec 2, 2025 |
Advertisement
Cleaning 3m read
0

The Easiest Way To Stop Trash Can Odors

Persistent garbage odors can linger in the bin even after you’ve taken the bag to the curb. If you’re battling bad scents coming from your trash can, try this simple hack that gets rid of them in just a few hours.

All featured products and deals are selected independently and objectively by the author. House Outlook may receive a share of sales via affiliate links in content.

Persistent garbage odors can linger in the bin even after you’ve taken the bag to the curb. If you’re battling bad scents coming from your trash can, try this simple hack that gets rid of them in just a few hours.

DIY Trash Can Deodorizer

Looking for an easy way to keep trash can odors at bay? You can make your own odor-absorbing sachets using a few simple items you likely have in your kitchen. The key ingredient in this hack is baking soda, which naturally eliminates odors by reacting with odor-causing acids and trapping smelly molecules on the spot. Just pour 2 to 3 tablespoons of baking soda into a disposable coffee filter (the basket-shaped ones work best), then seal it shut with a rubber band or clip to secure the contents.

Related: A Quick Fix for Lingering Cooking Smells

We like to make a few of these at a time and drop one or two into the bottom of the can, right under the trash liner or bag. If you notice your baking soda sachet isn’t as effective after a few weeks or months, just toss it and drop in a fresh one to keep your trash can — and your entire kitchen — smelling fresh.

More Ways To Reduce Trash Smells

Baking soda isn’t the only household ingredient that can quickly zap odors. Coffee grounds are another inexpensive way to reduce bad smells quickly. You can easily make the same deodorizing pouches using coffee grounds instead of baking soda and place them anywhere odors linger. We even like to drop these in our sneakers during the humid summer months to prevent stinky soles.

Advertisement

What else works? Try making an odor neutralizer with crushed, activated charcoal, or whip up a deodorizing spray using equal parts distilled white vinegar and water to spritz the inside of your trash can before adding a new bag.

A final tip: Keeping food waste separate from everyday trash will significantly reduce trash can odors. Compost bins and biodegradable bags are a great way to turn food scraps into fertilizer, but if you don’t have room, just toss your waste in a plastic bag and keep it in the freezer until you can move it to an outside garbage bin.

Advertisement
Advertisement
Organizing 2m read
0

Organize Any Drawer So Essentials Are Easy To Find

Never underestimate the power of a well-organized drawer. Being the precious storage real estate that they are, drawers are meant to keep everything you need neatly organized, but that only happens with a solid system in place.

All featured products and deals are selected independently and objectively by the author. House Outlook may receive a share of sales via affiliate links in content.

Never underestimate the power of a well-organized drawer. Being the precious storage real estate that they are, drawers are meant to keep everything you need neatly organized, but that only happens with a solid system in place.

In reality, many of us have ventured into junk drawer territory. We all have at least one drawer (if not several) where we’ve adopted a “throw and go” mentality. This might be convenient in the moment, but it becomes a bit of a nightmare when you can’t find what you’re looking for. Thankfully, there’s a simple, helpful, and ultimately better way to organize your drawers, and you’ll be surprised you didn’t think of it sooner. 

The Best Way To Organize Drawers

A good drawer organization system relies not on what you use to store items, but on where you place them. The key is to position your most-used items front and center. By front-loading your drawers with the things you need the most, you always know exactly where to find them.

By default, lower-priority items can be stored in the back of the drawer. Take a nightstand, for example. If you’re in the habit of taking vitamins or applying lotion before bed, those items should be placed at the very front of the drawer for easy access.

Advertisement

Taking It a Step Further

If you find that this front-loading system works well for you, then it’s time to level up your organization game. You can do this by investing in a set of drawer organizers to quickly whip any drawer into shape.

Related: Don’t Shop for Drawer Organizers Without Doing This First

Alternatively, you can use adjustable drawer dividers. When placed horizontally, these dividers can separate the front of the drawer from the back. When positioned vertically, they can divide the drawer into smaller, specialized compartments.

Advertisement
Advertisement
Food & Drink 3m read
0

Get Dinner Ready Sooner With This Defrosting Hack

Frozen food was one of the great innovations of the 20th century. Of course, that convenient new preservation method came with a corresponding inconvenience: having to thaw things before we cook them. The USDA endorses three defrosting methods: in the fridge overnight, in the microwave, or in cold water. While all three are effective, there’s a defrosting hack for quick meals that holds its own against those officially recognized methods.

All featured products and deals are selected independently and objectively by the author. House Outlook may receive a share of sales via affiliate links in content.

Frozen food was one of the great innovations of the 20th century. Of course, that convenient new preservation method came with a corresponding inconvenience: having to thaw things before we cook them. The USDA endorses three defrosting methods: in the fridge overnight, in the microwave, or in cold water. While all three are effective, there’s…

The Two-Pan Hack To Defrost Meat

Here’s how it works:

• Take one metal skillet (or other shallow metal pan) and place it upside down on your counter.

• Lay the package of food you want to defrost (meat, poultry, etc.) on top of the first pan.

• Put a second metal pan on top of the food, right side up.

• Give it about an hour or so to thaw.

Tip: This hack works best with meat that’s packaged as flat as possible. Consider portioning the meat into freezer bags and using a rolling pin or an empty wine bottle to compress it.

Related: The Secret Ingredient for Better-Browned Ground Beef

You can speed things up by putting a bit of weight in the top pan, such as a can of vegetables or a cup or two of water. This is optional, but that added weight helps make sure there’s good contact between the meat and the metal.

Advertisement

Now that you know how it works, you probably want to know why it works. Well, it’s basic science: Heat always moves from a warmer spot to a colder spot. When you cook, your skillets transfer the stove’s heat to your food; this thawing hack is just a slower version of that process, using the room’s ambient temperature as the heat source.

But What About Food Safety?

Quick weeknight meals are important, but food safety is even more important, of course. That’s why the USDA emphasizes overnight thawing in your refrigerator: It ensures your food always stays at a safe temperature. This skillet method falls into the same category as thawing in cold water: Only use it for food you plan to cook right away since it will get warmer than the safe range for storage. Still, it beats microwave thawing (which is uneven and gives you partially cooked spots) and water thawing (which can be messy and risks waterlogging your food).

This method won’t work for all cuts, of course. It’s best for things like thin steaks and chops, or packages of sliced or ground meat — especially if they’ve been packed flat to save thawing time and storage space. For larger items, such as a roast or a whole chicken, you’ll still need to use another defrosting method. They’re simply too large to thaw completely within a food-safe time frame, and their irregular shape means the top pan would just slide off.

Advertisement
Featured Image Credit:  Qwart/ iStock | Updated  Nov 23, 2025 |
Fred Decker
Writer
Fred Decker is a trained chef and former restaurateur. Since closing his restaurants over a decade ago he has been a prolific freelance writer, publishing several thousand articles on dozens of high-volume websites including Taste Of Home, Hunker, Tasting Table, Week&, eHow, and GOBankingRates. He lives on a rural acreage shared with a big garden, chickens, rabbits, and grandkids.
This article is for general informational purposes only.
Featured Image Credit:  Qwart/ iStock | Updated  Nov 23, 2025 |
Advertisement
Home Improvement 3m read
0

Forget This Winter Task and You Could Face Burst Pipes

There’s a well-known saying that the only two certainties in life are death and taxes. That’s true — but there are also a handful of other things that, while not as inevitable, seem to crop up year after year. Every January, for example, a horde of people search the internet for “best workout routines for beginners.” Similarly, once the winter cold sets in, searches for information on frozen pipes predictably spike.

All featured products and deals are selected independently and objectively by the author. House Outlook may receive a share of sales via affiliate links in content.

There’s a well-known saying that the only two certainties in life are death and taxes. That’s true — but there are also a handful of other things that, while not as inevitable, seem to crop up year after year. Every January, for example, a horde of people search the internet for “best workout routines for…

There’s no reason you should be one of them. To quote another well-known saying, “An ounce of prevention is better than a pound of cure.” Here’s the simple routine you need to winterize your outdoor faucet and avoid burst pipes before the next big freeze hits.

How To Avoid Burst Pipes

As the weather gets colder, your need to water the lawn and garden largely goes away. While a good watering can certainly help protect your plants from frost, you can use a bucket if necessary. So, once temperatures drop below freezing, it’s time to shut down your outdoor faucet for the winter. Here’s what to do:

1. Disconnect your hose from the outdoor faucet, drain it, and store it away for the winter in a sheltered spot.

2. Locate the indoor shut-off for the faucet (if you have one) and turn it off. Then, run the outside faucet until the water stops. Skip this step if you don’t have an indoor shut-off valve.

3. Place an insulated cover over the outdoor faucet. These are inexpensive and readily available at most hardware stores or online retailers.

That’s usually enough to do the job, but there are a few other things to consider if you experience severe winters.

Advertisement

More Tips for Colder Climates

If you live in a climate with cold winters (especially if you’re new to the area or your house), there are a few extra precautions worth taking.

Look inside your basement or buildup and locate the pipe that runs to your outdoor faucet. If it runs up an uninsulated wall in an unheated area, that section of the water line could freeze in an unusually harsh cold spell. You can prevent this by placing insulation between the wall and the pipe, or by buying the wrap-around insulation specifically meant for water lines. 

Related: Do This Once a Year To Save Your Home From Rot

If you want to be really sure, or if the neighbors warn you that frozen pipes are a common issue where you live, you can also wrap the water line with low-voltage heating tape. This is inexpensive as well, and means you’ll be able to sleep soundly (and so will your plumber) even during the worst cold snaps.

Advertisement
Featured Image Credit:  CRobertson/ iStock | Updated  Nov 23, 2025 |
Fred Decker
Writer
Fred Decker is a trained chef and former restaurateur. Since closing his restaurants over a decade ago he has been a prolific freelance writer, publishing several thousand articles on dozens of high-volume websites including Taste Of Home, Hunker, Tasting Table, Week&, eHow, and GOBankingRates. He lives on a rural acreage shared with a big garden, chickens, rabbits, and grandkids.
This article is for general informational purposes only.
Featured Image Credit:  CRobertson/ iStock | Updated  Nov 23, 2025 |
Advertisement
Cleaning 3m read
0

Clean Your Curtains Without Ever Taking Them Down

Cleaning curtains easily ranks near the top of many people’s “most annoying chores” list. Wrestling with the rod, bumping your head in the process, and then trying to stuff bulky fabric into your washing machine — or worse, hauling it to the dry cleaner — is nobody’s idea of fun. It’s no wonder this chore gets postponed again and again. Unfortunately, it must be done, as curtains quietly collect dust, allergens, pet hair, and the occasional mystery stain.

All featured products and deals are selected independently and objectively by the author. House Outlook may receive a share of sales via affiliate links in content.

Cleaning curtains easily ranks near the top of many people’s “most annoying chores” list. Wrestling with the rod, bumping your head in the process, and then trying to stuff bulky fabric into your washing machine — or worse, hauling it to the dry cleaner — is nobody’s idea of fun. It’s no wonder this chore…

Here’s the good news: There’s an easier way to get your curtains clean, and you don’t even have to take them down.

Start With a Good Shake and a Vacuum

Think of your curtains like a delicate, hanging rug. Instead of beating the dirt out, shake the curtains gently while they’re still on the rod to loosen any settled dust and debris. (A step stool will be helpful here.) It’s best to shake them from the top so everything falls downward, ideally out an open window.

Related: How To Clean Window Screens Without Taking Them Out

Next, grab your vacuum. Using the soft brush attachment, glide it from top to bottom, paying special attention to folds and pleats where dust loves to hide. Finish by giving the floor a quick once-over with the vacuum too.

Advertisement

Steam Away the Stale

Once the surface dust is gone, it’s time to take out the secret weapon: a steamer. A handheld garment steamer will smooth out wrinkles, lift away any lingering dust, neutralize odors, and even eliminate bacteria and dust mites — all without you ever having to take the curtains down.

After heating, move the steamer slowly in vertical strokes, keeping a couple of inches between the nozzle and the fabric. Use the gentlest setting, especially if your curtains are made of natural materials, such as cotton or linen, or delicate sheer fabric. Don’t worry about moisture, either; the curtains will be only slightly damp and will dry within minutes.

Fresh Air Does Wonders

After steaming, let Mother Nature take over. Open your windows, if possible, to let in a breeze. This airflow will help whisk away any lingering odors and keep mildew at bay, all while speeding up the drying process.

Advertisement
Featured Image Credit:  Deagreez/ iStock | Updated  Nov 23, 2025 |
Megan McCarty
Writer
Megan McCarty is a Los Angeles-based writer who covers the fun stuff: design, travel, wellness, beauty, and fashion. She has written for publications including Domino, The Spruce, MyDomaine, Bustle, and Rue Magazine. Her life rules include, but are not limited to, zipper when merging, contribute to your IRA, and do the nice thing.
This article is for general informational purposes only.
Featured Image Credit:  Deagreez/ iStock | Updated  Nov 23, 2025 |