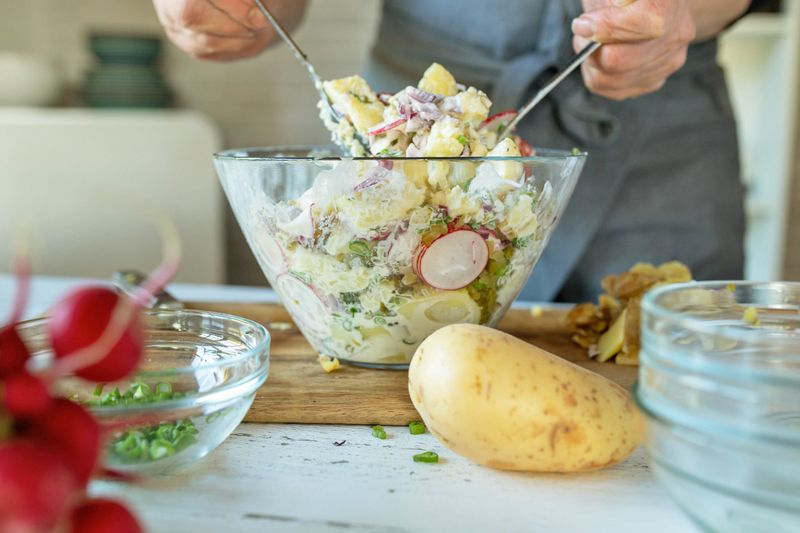
Advertisement
Decorating 2m read
6

Use the 70/30 Split To Make Your Space Look Expensive

Ever admired a friend’s home, a hotel lobby, or a celebrity’s sprawling mansion in a design magazine because it just felt right — cohesive but not cookie-cutter, layered but not chaotic? There’s a good chance a single, surprisingly simple design principle was at work: the 70/30 split. Interior designers have relied on this rule for years, but you don’t need a design degree to use it effectively. Here’s what you need to know about the 70/30 split and why it might be exactly what you need to elevate your space.

Ever admired a friend’s home, a hotel lobby, or a celebrity’s sprawling mansion in a design magazine because it just felt right — cohesive but not cookie-cutter, layered but not chaotic? There’s a good chance a single, surprisingly simple design principle was at work: the 70/30 split. Interior designers have relied on this rule for…

What Is the 70/30 Split?

The concept is straightforward: Divide a room into a ratio of 70/30, decorating 70% of the space with your anchor scheme and the other 30% with a contrasting style (or styles). This uneven ratio guarantees a room that’s visually interesting. “The 70/30 rule works because it naturally creates a sense of balance without feeling forced,” says Carol Alda, interior design coordinator at Z Gallerie.

Think of the 70% as your foundation — the main color palette, significant furniture pieces, and flooring. The 30% is where personality gets to play, whether through a bold accent chair, contrasting textures, or a few eye-catching accessories and pieces of artwork.

Related: 25 Hacks Only Interior Designers Know

Why It Works

The 70/30 split is more than just a visual trick; it offers a clear distinction between dominant and accent elements, gently guiding the eye through a space.

Advertisement

“When most of the space — 70% — is grounded in a cohesive palette and consistent materials, everything feels calm and pulled together. Layering in a smaller portion of contrast — 30% — through texture, shape, or a few standout pieces adds just enough interest to keep the space from feeling flat,” Alda says. “It’s that mix of restraint and variation that makes a room feel polished, but still personal and lived-in.”

Start With Color

Not sure where to begin? The easiest entry point is color. Use a consistent palette on walls, ceilings, and large furniture pieces. Then, bring in a bolder secondary color through accent rugs, throw pillows, and decor. Trust your eye and let the ratio guide you.

Advertisement
Featured Image Credit:  © Clay Banks/Unsplash.com | Updated  Apr 20, 2026 |
Megan McCarty
Writer
Megan McCarty is a Los Angeles-based writer who covers the fun stuff: design, travel, wellness, beauty, and fashion. She has written for publications including Domino, The Spruce, MyDomaine, Bustle, and Rue Magazine. Her life rules include, but are not limited to, zipper when merging, contribute to your IRA, and do the nice thing.
This article is for general informational purposes only.
Featured Image Credit:  © Clay Banks/Unsplash.com | Updated  Apr 20, 2026 |
Advertisement
Food & Drink 3m read
2

Why You Should Freeze Sweet Potatoes

It’s hard to find a more reliable pantry staple than the sweet potato. These root vegetables are incredibly adaptable, working just as well for breakfast as they do for dinner. They also provide valuable nutrients, including abundant amounts of fiber, vitamin A, and vitamin C. Best of all, they’re naturally sweet and delicious.

All featured products and deals are selected independently and objectively by the author. House Outlook may receive a share of sales via affiliate links in content.

It’s hard to find a more reliable pantry staple than the sweet potato. These root vegetables are incredibly adaptable, working just as well for breakfast as they do for dinner. They also provide valuable nutrients, including abundant amounts of fiber, vitamin A, and vitamin C. Best of all, they’re naturally sweet and delicious.

If you’ve mastered the basic baked sweet potato and you’re looking to elevate your preparation, there’s one surprisingly simple trick to try.

The Freezer Is Your Friend

Here’s what to do: Place your sweet potato (whole, not cut) into a freezer-safe, resealable bag and freeze it overnight or up to two days. When you’re ready to cook, preheat your oven to 450 degrees Fahrenheit, then bake the frozen sweet potato whole in its skin on a baking sheet lined with aluminum foil or parchment paper for 45 minutes to an hour. You want a very hot oven and a long bake — long enough for the sweet potato to leave a trail of burnt sugar on the baking sheet.

Why Freezing Works

There’s an interesting scientific process going on here. When the sweet potato freezes, the water inside crystallizes, breaking down the internal structure of the sweet potato without breaking its skin. This process “macerates” the flesh, making it softer and more pliable. When cooked later at a high temperature, the sugars caramelize nicely while the skin protects them from scorching. The result is a sweet potato that’s more evenly cooked and caramelized throughout.

Advertisement

Tips and Tricks

Don’t leave your sweet potatoes in the freezer longer than necessary. While they will be fine for a couple of days, you want to avoid forgetting about them — freezer burn will degrade their taste and quality. Make sure the sweet potatoes are in a freezer-safe bag or another airtight container. You don’t want them to dry out from direct exposure to the cold.

Related: You’re Not Using Your Potato Peeler Correctly

Once baked, the sweet potato can be cut down the middle and topped with your preferred fillings. You can also dice it, mash it, or use the flesh however you like. Simply season with your favorite spices and enjoy.

Advertisement
Featured Image Credit:  © Madelyn Wilkime/iStock | Updated  Apr 20, 2026 |
Allegra Ringo
Writer
Allegra Ringo is a California-based writer who has written for publications including Reductress, The Hard Times, VICE, and The Atlantic. She loves sparkling water and old Chihuahuas with hardly any teeth, like her dog Pistachio.
This article is for general informational purposes only.
Featured Image Credit:  © Madelyn Wilkime/iStock | Updated  Apr 20, 2026 |
Advertisement
Decorating 2m read
3

Every Room in Your Home Should Do Three Things

Creating a cozy living space is less about aesthetics and more about functionality. In our digitally connected world, we’re able to bring the outside in — working from home rather than commuting, streaming new releases instead of visiting the theater, and finding community through social media algorithms instead of extracurricular activities. With so much more time spent at home, and few of us possessing empty rooms just waiting to support a new hobby, traditional room labels have become outdated. In fact, they’re often a poor use of space. 

Creating a cozy living space is less about aesthetics and more about functionality. In our digitally connected world, we’re able to bring the outside in — working from home rather than commuting, streaming new releases instead of visiting the theater, and finding community through social media algorithms instead of extracurricular activities. With so much more time…

The ‘Three Purposes’ Design Philosophy

Traditionally, most people divide their homes by labeling each area according to its intended purpose: living room, kitchen, dining room, bedroom, office, laundry room, bathroom, etc. But if you stick strictly to those labels, you miss the opportunity to make the most of your square footage — even if it’s just a teeny-tiny hallway nook.

Related: 9 Ways To Make Your Living Room Better for Conversation

Instead, interior designer Courtnay Tartt Elias of Creative Tonic Design suggests adopting a “three purposes” philosophy. This concept, which Elias coined in a House Beautiful article, ensures every room in your home serves at least three purposes, maximizing the space and preventing any one area from sitting idle.

Advertisement

Your dining room could be a place to eat, a desk for remote work, and a craft studio. Similarly, your bedroom can be where you sleep, exercise, and house a wellness corner with a red-light panel and meditation cushion — or a library nook with a reading chair and your favorite books.

Regardless of your home’s size, this approach helps prevent those outdated, museum-like rooms that feel cold, uninviting, and rarely serve a practical purpose.

Advertisement
Featured Image Credit:  © AnnaStills/iStock | Updated  Apr 20, 2026 |
Jessie Quinn
Writer
Jessie Quinn is a Los Angeles-based lifestyle journalist with words published in PEOPLE, StyleCaster, Apartment Therapy, The Spruce, Byrdie, and more. She has a Bachelor's Degree in fashion journalism from Academy of Art University and her work spans across many categories, including style, beauty, home, health, crafts, and more.
This article is for general informational purposes only.
Featured Image Credit:  © AnnaStills/iStock | Updated  Apr 20, 2026 |
Advertisement
Cleaning 3m read
0

This Hack Solves Your Most Annoying Trash Problem

Tossing items in the trash is easy enough, but a common nuisance often arises. As the bin fills, the weight of the garbage pulls on the bag, causing the drawstring to slip off the rim and disappear into the can. At that point, you may have no choice but to reach into the slimy bin to fish out the bag. Fortunately, you can prevent this from ever happening with one simple trick. Here’s how to secure your garbage bag so it stays put.

All featured products and deals are selected independently and objectively by the author. House Outlook may receive a share of sales via affiliate links in content.

Tossing items in the trash is easy enough, but a common nuisance often arises. As the bin fills, the weight of the garbage pulls on the bag, causing the drawstring to slip off the rim and disappear into the can. At that point, you may have no choice but to reach into the slimy bin…

A Solution You’ll Be Hooked On

The drawstring on a garbage bag is essential for keeping it secure. To make it work, however, you need something to hook the loops onto. This is where adhesive hooks come in; they can be affixed to the sides of the bin for additional support.

When we say adhesive hooks, we mean products like Command hooks, which feature a sticky backing that adheres to most surfaces. Attach two hooks to opposite sides of the bin’s exterior, making sure they’re upside down so the “hook” part faces the floor. If they face upward, the drawstring won’t catch. Place the hooks about a third or a quarter of the way down from the top of the garbage bin and secure them firmly so they don’t slide off.

The next time you replace a garbage bag, start by putting it in the bin as usual. Loop the loose ends of the drawstrings — without pulling them tight — around the adhesive hooks to hold the bag firmly in place and prevent it from sliding into the bin. If you’re a visual learner, here’s an example of what that looks like.

Advertisement

Note that this hack works best with narrower bins — like those found in kitchens — where the bag is slightly larger than the bin. It’s most effective in setups with extra space around the sides, such as pull-out models. It may not work as well with freestanding bins, where the walls typically sit too close to allow enough room for the adhesive hooks.

Related: The Easiest Way To Stop Trash Can Odors

When the bag is full, removal is simple: Just unhook the loops, tie up the bag, and take it to the curb or the garbage chute. Best of all, the adhesive hooks will be ready and waiting for the next garbage bag.

Advertisement
Featured Image Credit:  © canart7/iStock | Updated  Apr 20, 2026 |
Bennett Kleinman
Staff Writer
Bennett Kleinman is a New York City-based staff writer for Inbox Studio, covering topics for several brands including House Outlook and Better Report. He previously contributed to television programs such as "Late Show With David Letterman" and "Impractical Jokers," and digital publications like The Onion. Bennett is also a devoted New York Yankees and New Jersey Devils fan, and thinks plain seltzer is the best drink ever invented.
This article is for general informational purposes only.
Featured Image Credit:  © canart7/iStock | Updated  Apr 20, 2026 |
Advertisement
Gardening 3m read
10

Why Gardeners Are Sticking Forks in Soil

The garden can be the perfect place to take in some fresh air, enjoy the sun on your skin, and relax among your favorite plants. That is, unless pests are determined to eat your greens right down to the root. If you’re battling bugs, rodents, birds, or even larger pests, the solution might be sitting at the bottom of your last takeout bag.

All featured products and deals are selected independently and objectively by the author. House Outlook may receive a share of sales via affiliate links in content.

The garden can be the perfect place to take in some fresh air, enjoy the sun on your skin, and relax among your favorite plants. That is, unless pests are determined to eat your greens right down to the root. If you’re battling bugs, rodents, birds, or even larger pests, the solution might be sitting…

Takeaway To Keep Away

If you’re looking to keep your garden pest-free all season long — and who isn’t? — grab some plastic forks. Those disposable utensils from your takeout orders can help shield your leafy greens from slugs, discourage squirrels from digging up your bulbs, and keep curious neighborhood cats out of your flower beds. This creative solution is quick and easy to execute, offering a humane alternative to pesticides and traps by building a physical barrier around your plants. And the prickly barrier doesn’t just deter animals from chomping on your stems — it can actually prevent them from reaching your plants in the first place.

Related: Skip the Pesticides — Try Beer Instead

How To Use Plastic for Pests

Setting up this barricade is easy and requires only plastic forks and a few minutes of your time. Take one fork and place it in the ground, handle-side down. With the prongs sticking up and the handle shoved securely into the dirt, repeat the process until your plants are safely surrounded by their plastic protectors. It’s best to space the forks 2 to 3 inches apart from one another, and about 1 to 2 inches away from the base of the plant to avoid damaging the roots.

Advertisement

While using old takeaway forks makes this hack free, a large garden might require a bulk pack of disposables, which you can reuse year after year.

For bigger intruders, such as deer, pack rats, or groundhogs, you can still go the physical barrier route by covering your crops with mesh garden netting or deer fencing. To combat smaller bugs — think aphids, spider mites, and mealybugs — give your plants a thorough coating of neem oil about once a week, making sure to target the undersides of leaves where they love to hide. You can also discourage these pests by balancing your soil chemistry. High nitrogen levels make plants’ leaves soft and their sap extra sweet, which these insects crave. Tucking a blanket of straw or dried leaves around the base of your plant helps stabilize the soil and keeps those nitrogen spikes in check.

Advertisement
Advertisement
Food & Drink 2m read
7

This Hack Doubles the Shelf Life of Brown Rice

Brown rice is a staple for a reason. Versatile, affordable, and more nutrient-dense than its white counterpart, it serves as a reliable base for almost any meal. Because of this, you may be tempted to buy a bulk bag, stick it in the pantry, and forget about it. Like other grains, brown rice feels like the type of ingredient that will never truly go bad, no matter how it’s stored. But is that actually the case?

All featured products and deals are selected independently and objectively by the author. House Outlook may receive a share of sales via affiliate links in content.

Brown rice is a staple for a reason. Versatile, affordable, and more nutrient-dense than its white counterpart, it serves as a reliable base for almost any meal. Because of this, you may be tempted to buy a bulk bag, stick it in the pantry, and forget about it. Like other grains, brown rice feels like…

You probably won’t like the answer. Brown rice contains natural oils that can go rancid, which significantly worsens the taste. Unlike white rice, brown rice still has its bran and germ attached — the very components that give it that nutritional edge. However, those layers are full of unsaturated fats that oxidize quickly, leaving the rice tasting stale and bitter. While eating a small amount of spoiled rice probably won’t harm you, the flavor is unpleasant and certainly not something you would want to serve. So, how can you extend the shelf life of brown rice?

An Ice Cold Solution

The answer lies, as it often does, in the freezer. Storing your brown rice in the freezer rather than the pantry can significantly prolong its freshness. While a pantry might seem like a sufficiently cool, dark environment, the reality is that temperature and moisture levels fluctuate. The freezer provides the consistent chill needed to keep those natural oils from spoiling. Inside the freezer, brown rice can last for up to 16 months, compared to just six months in the pantry.

Advertisement
Related: 6 Surprising Things You Can Make in Your Rice Cooker

Other Tips To Extend Brown Rice’s Shelf Life

Start by shopping in the right quantities. It may feel counterintuitive, but buying brown rice in small quantities is better due to its shorter shelf life. Once you get home, put it into an airtight container that can withstand freezing temperatures. Minimizing oxygen exposure is key; when oxygen comes into contact with those natural oils, they begin to turn. Keep the rice airtight and cold, and it will stay fresh for months longer.

Advertisement
Advertisement
Cleaning 3m read
143

You’re Probably Using Too Much Laundry Detergent

Whether it’s an open bar or an all-you-can-eat buffet, it’s easy to overindulge without realizing you’ve gone too far. The same can be said for laundry, as people typically use way too much detergent. Some believe more soap means cleaner clothing, but excessive amounts can actually lead to unwanted residue, stiff fabric, and musty odors trapped inside the fibers.

All featured products and deals are selected independently and objectively by the author. House Outlook may receive a share of sales via affiliate links in content.

Whether it’s an open bar or an all-you-can-eat buffet, it’s easy to overindulge without realizing you’ve gone too far. The same can be said for laundry, as people typically use way too much detergent. Some believe more soap means cleaner clothing, but excessive amounts can actually lead to unwanted residue, stiff fabric, and musty odors…

For these reasons, it’s probably in your best interest to cut back. So, how much detergent do you really need? While the precise amount depends on the size of the load, here’s a breakdown of what the experts recommend.

The Case for Using Less Detergent

When loading the washing machine, don’t just eyeball the detergent — and don’t follow the instructions on the bottle, either. Wirecutter writer and laundry expert Andrea Barnes suggests using 2 tablespoons of powdered or liquid detergent at most. “And that’s for the big loads, as in 12 pounds and up,” Barnes said in an interview with the outlet. “For most loads — the average is about 8 pounds — just 1 tablespoon is enough.” It sounds like a small amount, but Barnes claims it’s the ideal ratio for clean clothes without the soapy residue.

According to washing machine manufacturers such as Whirlpool and LG, 2 tablespoons is indeed plenty for a normal-sized load in a high-efficiency washing machine. It’s worth noting that using too much detergent isn’t harmful only to clothing; it’s bad for the machine, too. Soapy residue can build up inside, creating mechanical issues that cause the unit to operate less efficiently.

Most laundry detergents sold today are high-efficiency (HE), which are ultraconcentrated, designed to work with less water, and produce fewer suds than traditional soap. This is why you need only 1 to 2 tablespoons to wash an entire load. If your washing machine was made before 2004, you may need to use slightly more HE detergent — about 1/4 cup — to account for the higher water volume. This measurement applies to both powdered and liquid HE detergent.

Advertisement

Don’t Trust the Cap

Keep in mind that detergent makers typically tell you to use more product than necessary. Don’t be fooled by the markings on the cap, which often exceed 2 tablespoons. For example, Tide recommends filling the cap to line 1, which represents 1.5 ounces (about 3 tablespoons) of liquid detergent. Instead, keep a dedicated measuring spoon in the laundry room to confirm you’re adding only what you need.

Related: How To Pick the Right Water Temperature for Every Load of Laundry

At the end of the day, a small amount of detergent goes a long way toward cleaning your clothes, keeping the machine in working order, and saving you money. If a recent load felt stiff or smelled musty, try cutting back on the detergent. You’ll likely notice a positive difference.

Advertisement
Featured Image Credit:  © mihailomilovanovic/iStock | Updated  Apr 13, 2026 |
Bennett Kleinman
Staff Writer
Bennett Kleinman is a New York City-based staff writer for Inbox Studio, covering topics for several brands including House Outlook and Better Report. He previously contributed to television programs such as "Late Show With David Letterman" and "Impractical Jokers," and digital publications like The Onion. Bennett is also a devoted New York Yankees and New Jersey Devils fan, and thinks plain seltzer is the best drink ever invented.
This article is for general informational purposes only.
Featured Image Credit:  © mihailomilovanovic/iStock | Updated  Apr 13, 2026 |
Advertisement
Food & Drink 3m read
34

The No-Mess Pancake Batter Hack

Many people would agree that a short stack of pancakes is one of the best ways to start the day. Pancakes are a favorite in American diners and home kitchens alike, thanks to their fluffy texture, lightly sweet taste, and versatility.

All featured products and deals are selected independently and objectively by the author. House Outlook may receive a share of sales via affiliate links in content.

Many people would agree that a short stack of pancakes is one of the best ways to start the day. Pancakes are a favorite in American diners and home kitchens alike, thanks to their fluffy texture, lightly sweet taste, and versatility.

As breakfasts go, pancakes are also a relatively easy undertaking. You can use a boxed mix to speed up the process or whisk them together with just flour, sugar, baking powder, eggs, milk, and butter. The biggest hurdle is actually portioning the batter. Somehow, homemade pancakes never seem to look as uniform or as satisfyingly round as the ones in restaurants.

Ditch the Ladle

The solution? A repurposed, thoroughly cleaned ketchup bottle. Instead of using a ladle or measuring cup to spoon pancake batter onto the griddle, opt for a squeeze bottle. Save the bottle from the recycling bin and scrub it inside and out — this is the most important step. When it’s pancake time, fill the bottle with batter (a funnel helps here) and squeeze perfectly neat circles onto the griddle. This may even be how your favorite diner does it: Many chefs use squeeze bottles for the clean aesthetic and to avoid the mess of a ladle.

When portioning your pancakes, draw the outline first and then fill it in with batter. This technique ensures neat edges and allows you to get creative with shapes. Try dinosaurs or hearts for kids (don’t forget the chocolate chips), or assemble brunch skewers using mini pancakes and sliced fruit.

Advertisement

More Tips for Perfect Pancake Preparation

The secret to perfect pancakes lies in the technique. While the batter itself is simple, there’s plenty of nuance to the cooking process. First, let the batter rest for 10 minutes after mixing. Second, ensure the griddle is truly hot enough before you begin. Flick a couple of water droplets onto the surface of the pan to test the temperature. If they start sizzling immediately, the griddle is good to go.

Related: You’ve Been Throwing Away This Versatile Ingredient

Have patience while the bottom of the pancake cooks. Wait until the bubbles on the surface have popped before flipping. Finally, don’t be afraid to throw out the first pancake — or feed it to the dog, assuming it’s plain and fully cooked. The first one famously tends to fail, but that’s OK. Just squeeze the next round onto the griddle and trust the process.

Advertisement
Featured Image Credit:  © Mikki Speid/Unsplash.com | Updated  Apr 13, 2026 |
Allegra Ringo
Writer
Allegra Ringo is a California-based writer who has written for publications including Reductress, The Hard Times, VICE, and The Atlantic. She loves sparkling water and old Chihuahuas with hardly any teeth, like her dog Pistachio.
This article is for general informational purposes only.
Featured Image Credit:  © Mikki Speid/Unsplash.com | Updated  Apr 13, 2026 |
Advertisement
Organizing 3m read
41

Why You Need a ‘Use Me Bin’ in Every Room

When you’ve got the itch to declutter, tossing almost-empty bottles feels like an easy win — but it’s often a waste of product and money. Even if you resist the urge to throw them out, these half-used items often migrate to the back of the cabinet where they eventually expire and get replaced anyway. To break this cycle, you need a visual reminder that keeps your nearly finished household goods front and center until every last drop is gone.

When you’ve got the itch to declutter, tossing almost-empty bottles feels like an easy win — but it’s often a waste of product and money. Even if you resist the urge to throw them out, these half-used items often migrate to the back of the cabinet where they eventually expire and get replaced anyway. To…

Time for a ‘Use Me’ Bin

“Use it or lose it” applies to many things in life, including those almost-empty containers with just a little bit of product left. Whether it’s the last squeeze of ketchup in the fridge or the final few pumps of lotion on your vanity, letting partially filled containers sit while you move on to fresh ones leads to waste and unnecessary clutter. The solution? Create a designated “use me” bin to prioritize those items. You can implement this practice in any space, including the kitchen pantry, the refrigerator, under the sink, the bathroom vanity, and the laundry room.

In an r/CleaningTips subreddit thread, users shared their most effective spring cleaning hacks. One Redditor, AdChemical1663, suggested creating “use me” baskets for storage areas with consumables. These are designated bins placed within each space (such as a bathroom vanity or kitchen cabinet) that corral almost-empty products from that room, keeping them visible and grouped together so they don’t get lost or forgotten at the back of drawers or shelves. “So the hair mask with one to two treatments left, the liquid hand soap with half an inch left, the condiment with a quarter cup left, the cleaning product that’s almost empty … anything you’re saving for a special occasion? This is the occasion,” user AdChemical1663 wrote.

Advertisement

You can use any container you have on hand, but we recommend an open-top bin for direct access. This ensures you don’t have to remove a lid or disturb other items when retrieving or returning a nearly empty bottle.

Related: 12 Items You’ll Never Regret Decluttering

Sort From Least to Most

If you want to take your organization a step further, try sorting your “use me” bin by volume. Start with the containers that are nearly empty to quickly clear out the stragglers and reclaim your storage space.

Advertisement
Advertisement
Food & Drink 3m read
50

Add This to Cooked Broccoli To Boost Its Health Benefits

It’s no secret that a healthy diet can help prevent illness and keep you feeling better for longer. It’s also well known that cruciferous vegetables — the vast family including cabbage, kale, mustard greens, broccoli, and Brussels sprouts — are prized for their nutritional value.

All featured products and deals are selected independently and objectively by the author. House Outlook may receive a share of sales via affiliate links in content.

It’s no secret that a healthy diet can help prevent illness and keep you feeling better for longer. It’s also well known that cruciferous vegetables — the vast family including cabbage, kale, mustard greens, broccoli, and Brussels sprouts — are prized for their nutritional value.

One component contributing to these health benefits is a compound called sulforaphane, which shows promise in protecting against certain kinds of cancer, diabetes, and obesity. The catch is that cooking broccoli, or other vegetables in this family, deactivates myrosinase, the enzyme needed to create sulforaphane. Fortunately, if you’ve already cooked your broccoli, you can still add this enzyme back in — here’s how.

Reach for the Mustard

Cruciferous vegetables go by many names: You may know them as brassicas or the “cabbage family,” but it’s just as accurate to refer to them as the “mustard family.” Mustards are one of the largest groups within the brassicas, whether they’re grown for the seeds used in condiments or for pungent leafy greens such as mizuna and tatsoi.

Related: Why You Should Freeze Bread Before You Eat It

Because they’re close kin to broccoli, mustard plants produce a significant amount of myrosinase. This makes mustard a quick way to bring the enzyme back to your plate once the vegetables are cooked. A light sprinkling of mustard powder (be careful, it’s potent) or a homemade, mustard-based dressing or sauce will do the trick.

Advertisement
Freshness Is Key

Most packaged mustard products from the grocery store do not contain myrosinase. These are pasteurized for shelf stability, a process that destroys the heat-sensitive enzyme. A better option is to choose a stone-ground mustard from the refrigerated section or whisk together a sauce at home using dry mustard powder. When used raw — meaning it hasn’t been heat-treated — the spice retains active myrosinase.

A Culinary Match

The close relationship between broccoli and mustard is more than just a nutritional coincidence; it’s a perfect culinary partnership. Mustard-based sauces and vinaigrettes work well with broccoli and other brassicas such as cauliflower, Brussels sprouts, and cabbage. As a bonus, mustard acts as an emulsifier to thicken your vinaigrette. You can even serve a good-quality sweet or grainy mustard as a dipping condiment for your broccoli — the flavors go together better than you might expect.

No matter how you combine them, a dab of mustard helps bring out the full health potential of your broccoli. It’s proof that eating well doesn’t have to mean eating food that tastes bad.

Advertisement
Featured Image Credit:  © GMVozd/iStock | Updated  Apr 13, 2026 |
Fred Decker
Writer
Fred Decker is a trained chef and former restaurateur. Since closing his restaurants over a decade ago he has been a prolific freelance writer, publishing several thousand articles on dozens of high-volume websites including Taste Of Home, Hunker, Tasting Table, Week&, eHow, and GOBankingRates. He lives on a rural acreage shared with a big garden, chickens, rabbits, and grandkids.
This article is for general informational purposes only.
Featured Image Credit:  © GMVozd/iStock | Updated  Apr 13, 2026 |