Advertisement
Cleaning 3m read
13

The Secret to Luxuriously Soft Bed Sheets

Welcome to Spring Cleaning Week! To celebrate the season, and the tidying rituals that go along with it, we’ll be sharing cleaning hacks like this one all week long.

All featured products and deals are selected independently and objectively by the author. House Outlook may receive a share of sales via affiliate links in content.
Advertisement - Continue reading below

Welcome to Spring Cleaning Week! To celebrate the season, and the tidying rituals that go along with it, we’ll be sharing cleaning hacks like this one all week long.

After a long day, there’s nothing quite as satisfying as crawling under the covers for a night of restful z’s. That is, as long as your sheets are as soft as a cloud — scratchy bedding will have you tossing and turning. If your sheets feel more like sandpaper than silk, there’s good news: An easy, inexpensive solution to softening them is only one wash away.

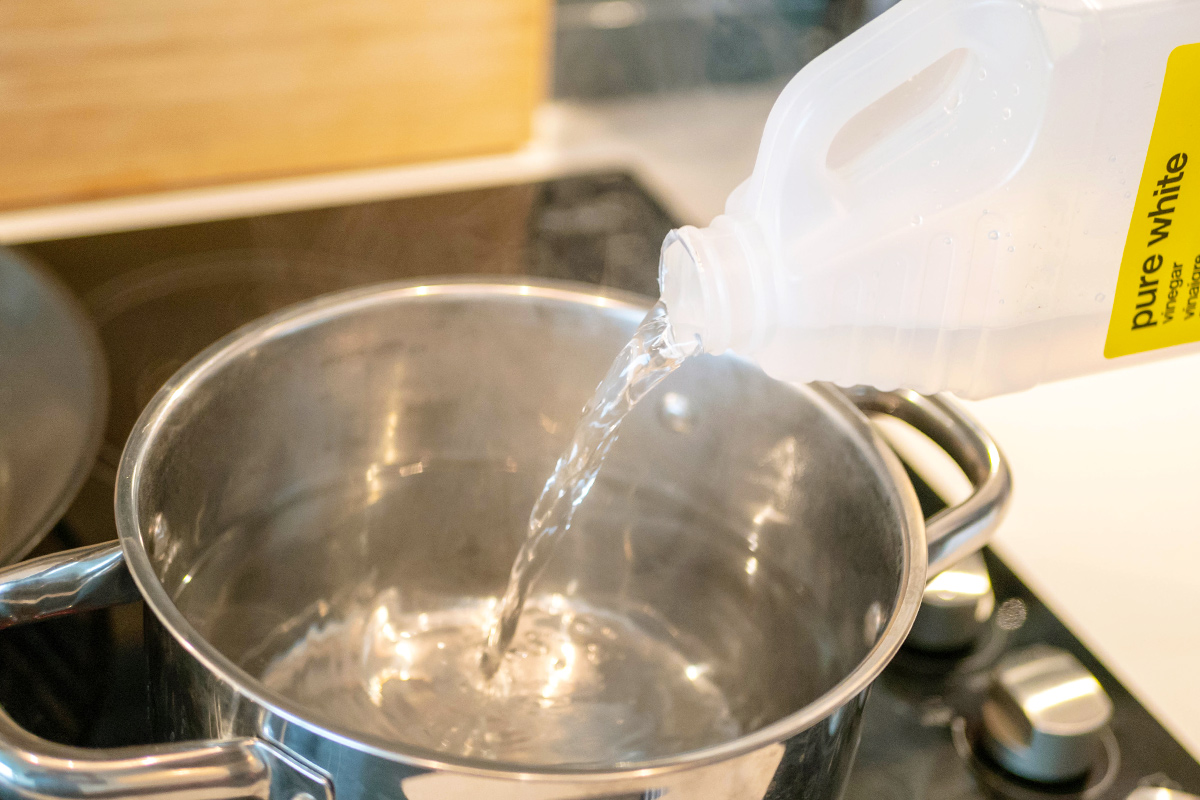
Forget fabric softeners, which are full of chemicals and leave behind a waxy coating. No need to throw down a paycheck on pricey bedding either. Instead, reach for two items that are likely already in your pantry: baking soda and distilled white vinegar.

These kitchen staples are a powerful cleaning combo, helping to deodorize your garbage disposal, deep clean your washing machine, or lift stains from wooden cutting boards. Turns out they’re just as effective as a natural fabric softener.

Related: This Paint Finish Promotes Better Sleep

Why use baking soda and vinegar? Baking soda helps break down detergent buildup, while vinegar dissolves residues and relaxes fabric fibers. Together they’re a dynamic sheet-softening duo, all without chemicals or artificial fragrances. Don’t worry about your freshly laundered bedding smelling like vinegar either — the scent disappears once the sheets are dry.

What You’ll Need

1 cup of baking soda

½ cup of distilled white vinegar

Advertisement

How To Soften Sheets Naturally

1. Pour 1 cup of baking soda into the drum of your washing machine. Then add your sheets, and wash them on a hot water cycle without additional detergent. 

2. When the rinse cycle begins, pour ½ cup of distilled white vinegar into the fabric softener compartment. For best results, switch to cold water during the rinse cycle.

3. Line dry the sheets, or dry them on low heat using wool dryer balls.

4. Repeat this process every few weeks to maintain softness.

Note: If your sheets are dirty, you’ll want to wash them with detergent first, then proceed to softening.

A Bonus Trick To Try

Salt is another kitchen staple that can double as a natural fabric softener. Since it’s mildly abrasive, salt helps break down stiffening agents (such as starch), relaxing the fibers, and making them feel softer over time. Add 1 cup of salt to a tub of cool water, then soak your sheets overnight. The next day, wash your bedding as usual.

Advertisement
Advertisement
Cleaning 3m read
1

An All-Natural Cleaning Hack for a Spotless Microwave

Welcome to Spring Cleaning Week! To celebrate the season, and the tidying rituals that go along with it, we’ll be sharing cleaning hacks like this one all week long.

All featured products and deals are selected independently and objectively by the author. House Outlook may receive a share of sales via affiliate links in content.
Advertisement - Continue reading below

Welcome to Spring Cleaning Week! To celebrate the season, and the tidying rituals that go along with it, we’ll be sharing cleaning hacks like this one all week long.

Cleaning the microwave is a task that often falls by the wayside. If you get food splatter all over the walls while you’re cooking, wiping them down is probably the last thing you want to do before tucking into your meal. Then again, leave it for another day and you’ll be met with baked-on sauces or hardened bits of food that are tough to remove, especially in those tight corners.

Thankfully, a few inexpensive household items are all it takes to loosen microwave grime. Try this steam cleaning hack that will leave you with a spotless microwave in a matter of seconds.

Farewell, Microwave Mess

To remove stubborn stains, take advantage of the microwave’s heating function to soften them. Start by combining 1 cup of tap water, 1 to 2 tablespoons of distilled white vinegar, and two or three lemon slices in a microwave-safe bowl. (For maximum cleaning power, squeeze some of the juice from the lemon slices into the water.) Leave the bowl uncovered and set your microwave to high. Run it for two to three minutes, or until the liquid mixture is steaming hot.

The next step is very important: When the microwave beeps, leave the door closed for five minutes. This allows all of that vinegar-rich steam to soften up the food particles, requiring no effort on your part. When everything has cooled, open the door and carefully remove the bowl. Dip a microfiber cloth in your cleaning solution, wring it out, and use it to wipe down the interior of the microwave.

Advertisement

Cleaning With Vinegar and Lemon

Steam makes quick work of wiping away all that grime and grit. Once you’re finished with this chore, don’t toss the remaining cleaning mix — put it to good use elsewhere. You can use the ingredients to gently and effectively clean other areas of your home. 

Related: An Easy Way To Remove Baked-On Food in Your Oven

Both vinegar and lemons are acidic, making them great options for breaking down dirt and grime. Use the cleaning solution to wipe down the outside of your microwave, the inside and outside of your refrigerator, your cooktop, nonmarble countertops, or soap scum buildup in the bathroom.

Advertisement
Advertisement
Cleaning 5m read
1,359

The Ultimate Guide to Allergy-Proofing Your Home This Spring

Springtime means longer (and hopefully sunnier) days, new blooms, buzzing pollinators, and — of course — allergies. Those of us with seasonal allergies might welcome the equinox by sneezing our way through longer neighborhood walks and more time spent outdoors. But some of the biggest allergy culprits aren’t necessarily lurking in your backyard, public parks, and neighborhood gardens; the great indoors can be just as triggering for allergies as the great outdoors.

All featured products and deals are selected independently and objectively by the author. House Outlook may receive a share of sales via affiliate links in content.
Advertisement - Continue reading below

Springtime means longer (and hopefully sunnier) days, new blooms, buzzing pollinators, and — of course — allergies. Those of us with seasonal allergies might welcome the equinox by sneezing our way through longer neighborhood walks and more time spent outdoors. But some of the biggest allergy culprits aren’t necessarily lurking in your backyard, public parks,…

Our homes might seem like safe havens from allergens, but dust, mold, pet dander, and even pollen from the outside world can cause just as much discomfort as seasonal changes. To minimize these triggers, there are a few things you can do to ensure your home offers relief from allergies.

How To Get Rid of Indoor Allergens

Whether you’re indoors or outdoors, allergens are a normal part of everyday life. And while they can be tricky to deal with — especially when they’re out of your control — there are steps you can take to allergy-proof your home and create a space that doesn’t just look spring-cleaned but feels spring-cleaned (your sinuses certainly won’t lie to you).

When allergy-proofing your home, the goal is to decrease common allergens, such as dust, mold, pet dander, and pollen. Here are some tips and tricks to help you get rid of indoor allergens for a more effective spring clean.

Advertisement

Vacuum Regularly

It goes without saying that vacuuming is one of the best ways to pick up dirt, dust, dander, and other allergens. But while vacuuming regularly — we’re talking at least once or twice a week — can help you reduce allergens inside, the type of vacuum you use can make an even bigger impact. To ensure your vacuum gives you the most effective clean, go with a bag-free HEPA model designed specifically for allergens, such as the MultiClean Allergen Lift-Off Pet Vacuum Cleaner from BISSELL.

Credit: Nina Zeynep Güler/ Unsplash

Wash Your Bedding

Dust loves a comfy bed, so it’s a great idea to keep up with your laundry and wash your bedding at least once a week to keep allergens at bay. Additionally, invest in a dust cover for your mattress and pillows to keep those pesky dust mites away.

Related: The Best Way To Clean Your Mattress

Tip: If you have a pet who shares your bed, consider changing or washing your bedding more frequently to minimize pet dander.

Credit: triocean/ iStock
Advertisement

Invest in a High-Quality Air Purifier

Air purifiers are a surefire way to address airborne allergens, and investing in a high-quality option can make a world of difference. For the best air purifiers, consider brands such as Coway, Blueair, and LEVOIT. If you travel often and have concerns about air quality while you sleep, you can even opt for a travel-friendly air purifier such as the Levoit Core® Mini Air Purifier or the Conair Portable Air Purifier.

Credit: RgStudio/ iStock

Dust With Intention

There are so many ways to get rid of dust in your home, and anything that kicks it up into the air (we’re looking at you, feather dusters) is worth avoiding. Instead, dust with intention and use damp microfiber cloths to pick up the debris. You can also try microfiber gloves for harder-to-reach and delicate areas such as plant leaves (yes, those need to be dusted, too) and trinket shelves. It’s worth changing the order in which you dust, too; dust from top to bottom, not ground up, to avoid sprinkling dust on recently cleaned areas.

Credit: Karolina Grabowska/Unsplash+
Advertisement

Wash Your Curtains

When was the last time you threw your curtains in the wash? Curtains are known to collect dust and dust mites, so it’s worth giving them a good rinse every three to six months — just be sure to consult the care label first. While your curtains are down, don’t forget to dust the rods and finials.

Credit: Sergio Cervera Moreno/ iStock

Keep Your Windows Closed

If outdoor pollen is a major trigger, try to keep your windows closed as much as possible. Opening up your windows invites all of that outdoor pollen into your home — especially on breezy days — and can provoke allergy responses.

Credit: SolStock/ iStock
Related: Get Into Tight Spaces With This Clever Vacuuming Hack

Bathe Your Pets

Giving your dogs and cats a bath is not only great for their health, but also great for yours. Pet fur can collect allergens (both indoor and outdoor), and snuggling up with them may increase your allergy response. Bathing your pets regularly can reduce allergens in your home and make it smell a whole lot fresher.

Credit: mixetto/ iStock
Advertisement
Advertisement
Decorating 3m read
16,935

This Designer Trick Makes Vignettes Look More Cohesive

Take a quick glance around your home. Chances are, you’ll spot a vignette in nearly every room, from a cluster of candles and hardcover tomes on a coffee table in the living room to a vase of flowers, a lamp, and a trinket dish on a nightstand in a bedroom. These thoughtful groupings offer an opportunity to showcase your most meaningful items, such as framed family photos and souvenirs from your travels. You can’t slap a few random items together and call the decorating done, though. Fortunately, there’s a trick interior designers use to create well-balanced, visually appealing vignettes.

All featured products and deals are selected independently and objectively by the author. House Outlook may receive a share of sales via affiliate links in content.
Advertisement - Continue reading below

Take a quick glance around your home. Chances are, you’ll spot a vignette in nearly every room, from a cluster of candles and hardcover tomes on a coffee table in the living room to a vase of flowers, a lamp, and a trinket dish on a nightstand in a bedroom. These thoughtful groupings offer an…

The Art of Subtle Similarity

So, what’s this designer secret? It’s simpler than you might think. Decorative objects should be cousins, not twins; similar, but not the same. The eye is drawn to repetition: find a common thread between items, such as a color or texture. This creates a natural focal point while avoiding that overly coordinated, matchy-matchy look.

Keep in mind that items aren’t superglued to your coffee table either. Alex Bass, founder and CEO of art advisory and interior design studio Salon 21, says vignettes encourage you to routinely flex your creativity.

Related: Nostalgic Home Design Trends That Are Staging a Comeback in 2025

“I believe vignettes in the home should be dynamic, changing regularly based on new flowers, objects, or books,” Bass says. Below, the designer breaks down the best way to decorate different types of vignettes.

Advertisement

Bookshelves

Despite the name, you don’t need to fill a bookshelf solely with books. These shelves allow for many design-forward vignettes, Bass says.

“I have a deep appreciation for bookshelves that not only showcase literature but also display an eclectic mix of unique objects such as vases, artwork, and more,” she shares. Bass recommends arranging your books in various orientations — some vertical, others stacked on top of each other — to increase visual intrigue. This varied arrangement also ensures some negative space, which is pleasing to the eye.

Bonus Tip

Decorate in odd numbers. The “rule of three,” commonly used in interior design, creates a balanced feel.

Advertisement

Tablescapes

Are guests coming over for dinner? To design a captivating tablescape, Bass emphasizes the importance of varying the height of decorative objects, such as vases and taper candles — items that don’t hog all the table space and allow conversation to flow. Flowers are always welcome, too; they add color, texture, and liveliness.

Vanities

For a bathroom vanity, keep utilitarian items (think makeup or skin care products) hidden away in a drawer. Then create a vignette with beautiful (and still practical) items, such as a vintage tray topped with a marble soap dispenser and a small trinket dish for jewelry. “This creates a refined and thoughtful display that emphasizes beauty and functionality,” Bass says.

Advertisement
Advertisement
Cleaning 3m read
1,959

Get Into Tight Spaces With This Clever Vacuuming Hack

Most vacuums come with various hoses, scrubbers, and attachments to help you get into tight spots or clean delicate surfaces. However, sometimes even the sleekest and most angled attachment heads can’t reach certain areas. Because these vacuum accessories are typically made of rigid plastic, they lack the flexibility to get into every nook and cranny.

All featured products and deals are selected independently and objectively by the author. House Outlook may receive a share of sales via affiliate links in content.
Advertisement - Continue reading below

Most vacuums come with various hoses, scrubbers, and attachments to help you get into tight spots or clean delicate surfaces. However, sometimes even the sleekest and most angled attachment heads can’t reach certain areas. Because these vacuum accessories are typically made of rigid plastic, they lack the flexibility to get into every nook and cranny.

If you’ve got specific spots you just can’t seem to clean with a crevice tool — perhaps sliding glass door tracks or under the refrigerator — give this simple hack a try. You likely already have what you need in your recycling bin right now.

An Unexpected Vacuum Attachment

The smaller the opening, the more suction you’re going to get out of your vacuum cleaner attachment. Hard-to-reach areas in your home or car may require narrow precision to remove all the dirt. In these instances, simply reach for a toilet paper or paper towel roll.

Related: 10 Items Around the House That Are Way Dirtier Than You Think

The little cardboard tube you typically toss in the bin can be repurposed to deep clean tight spaces, such as window tracks, car consoles, baseboards, crown molding, and even between grooves or notches in hardwood flooring.

Advertisement

To use this cleaning hack, first remove any attachments from your vacuum hose. (If you need a bit more reach, however, keep the crevice tool on.) Then, slide one end of the toilet paper or paper towel roll right over the hose. If it doesn’t fit securely, add a couple of rubber bands or tape. Fold or bend the other end of the roll to fit the shape of the space you need to clean. All that’s left is to power on your vacuum and use your new DIY custom attachment to pick up stubborn dirt, hair, and debris.

This hack is also a great way to vacuum delicate surfaces, such as painted areas; the cardboard is much softer and less abrasive than plastic attachments. So, start saving those toilet paper and paper towel rolls — they’re your secret weapon for keeping those hard-to-reach areas spotless.

Advertisement
Advertisement
Cleaning 2m read
8,114

This Unexpected Tool Is a Pet Hair Magnet

We all love our pets, but we don’t love cleaning up their fur. It gets everywhere from the couch to our clothes, but no spot is more stubborn than the rug. Fur embeds itself in the fibers, especially the high-pile variety, and replenishes itself on a daily basis. If you’re tired of vacuuming to no avail as your cat or dog looks on in terror, oblivious to the fact that they’re the reason you’re performing this chore, try a squeegee.

All featured products and deals are selected independently and objectively by the author. House Outlook may receive a share of sales via affiliate links in content.
Advertisement - Continue reading below

We all love our pets, but we don’t love cleaning up their fur. It gets everywhere from the couch to our clothes, but no spot is more stubborn than the rug. Fur embeds itself in the fibers, especially the high-pile variety, and replenishes itself on a daily basis. If you’re tired of vacuuming to no…

In addition to being gentle on the rug (or carpet, for that matter), a squeegee is a veritable magnet for pet hair. Use it the same way you would on anything else: Run the rubber blade along the rug’s surface in a sweeping motion, allowing you to easily lift and gather the pet hair. From there, use the vacuum as you normally would — only now, it’ll get rid of all the fur, not just surface-level debris.

Related: The Carpet Cleaning Hack That Could Damage Your Vacuum
Advertisement

Below the Surface

You may need to squeegee every other day or once a week, depending on how many pets you have, how much they shed, and your rug or carpet type. The good news is that a squeegee is just as effective on upholstery, car interiors, bedding, and even hardwood. They’re sold online and at most big-box stores, usually for around $10.

You can also prevent buildup by regularly brushing your furry friend. A good brush will also set you back $10 or so, and many pets love it. Regular brushing is proven to have many benefits beyond ensuring your rugs and carpets stay clean: keeping your pet’s skin healthy, their coat shiny, and even strengthening your bond with them.

Advertisement
Advertisement
Gardening 2m read
0

Going on Vacation? Don’t Forget This Plant Care Trick

Traveling and plant parenting don’t typically mix. But with a few tips and tricks, you can ensure your plants stay healthy and happy while you’re on vacation — even if you’re gone for weeks at a time.

All featured products and deals are selected independently and objectively by the author. House Outlook may receive a share of sales via affiliate links in content.
Advertisement - Continue reading below

Traveling and plant parenting don’t typically mix. But with a few tips and tricks, you can ensure your plants stay healthy and happy while you’re on vacation — even if you’re gone for weeks at a time.

The key to taking care of your plants while traveling is to plan ahead. While your houseplants can last without nutrients when you’re away, they still need water to survive. For some plants, you can opt for accessories such as water globes, self-watering spikes, ollas, and watering wicks. For others, you can try something called the bathtub method.

Related: This Is the Best Way To Dust Delicate Plant Leaves

This method requires a little bit of planning but is one of the best ways to water plants while you’re out of town. And according to Jacintha Webster, a plant expert and creator of Pass That Plant, you can leave plants for upwards of 25 days with this self-watering trick.

Advertisement

How To Care for Plants While on Vacation

The bathtub method is a type of bottom watering that nourishes multiple plants simultaneously and creates an environment where they won’t just survive, but thrive. Simply fill your bathtub with 2 to 3 inches of water and use a trusty drain stopper to keep it filled (for reinforcement, you can try a silicone suction stopper over top). Then, place your plants in the bathtub as close together as possible so they can bottom feed and share the moisture they naturally release into the air. This hack is just as effective with only a couple of plants, but if you have a growing collection, don’t be afraid to pack them in there.

To ensure this plant hack works best, check that all of your plant pots have a drainage hole so the water can get in (it’s also worth removing any drainage trays). If you have plants that are prone to root rot — think cacti, succulents, snake plants, ferns, pothos, and peace lilies — it’s best to leave those out of the bath. Instead, utilize a different plant self-watering method, such as water globes or ollas. Also, make sure your bathroom receives enough sunlight, as that’s how your plants make food and get the energy they need.

Advertisement
Advertisement
Organizing 2m read
1,195

Stop Clothes From Slipping Off Hangers With This Simple Trick

When it comes to doing laundry, washing your clothes is only half the battle. The real challenge is putting everything away once it’s clean and dry. Some items can be folded and tucked in a drawer, while others can be hung up in a closet. Both storage methods have their advantages, but hanging clothes helps to prevent wrinkles, maintain a garment’s shape, and provide greater visibility. Without nonslip hangers, though, those benefits may be lost.

All featured products and deals are selected independently and objectively by the author. House Outlook may receive a share of sales via affiliate links in content.
Advertisement - Continue reading below

When it comes to doing laundry, washing your clothes is only half the battle. The real challenge is putting everything away once it’s clean and dry. Some items can be folded and tucked in a drawer, while others can be hung up in a closet. Both storage methods have their advantages, but hanging clothes helps…

Some hangers and clothes simply don’t mix, and a slippery garment can easily slide off, making a mess in your closet. Fortunately, there’s a trick to make any hanger nonslip, and all it takes is a few rubber bands.

What You’ll Need

Hangers

2–4 rubber bands (preferably wide ones) per hanger

Advertisement

An Easy DIY Nonslip Hanger Hack

First, grab any clothes hanger with a crossbar. Take a rubber band — a wide, heavy-duty option is best — and wrap it around one of the shoulder supports until it’s secure, placing it about 2 inches in. For extra grip, add a second rubber band. Repeat on the other shoulder support, then hang the clothing item as you normally would. Instead of falling off, the fabric will catch on the rubber, keeping the garment in place. With this quick hack, you can upgrade the hangers you already have and tidy your closet at the same time.

Related: This Jean-Hanging Hack Will Make Your Closet Look Like a Boutique

Extra Nonslip Tips

Don’t love the look of rubber band-wrapped hangers? There are other ways to make them nonslip. You can use a hot glue gun to add hot glue dots to the shoulders of your hangers, enhancing their grip, or you can buy hanger grips, such as these ones on Amazon. Made of soft rubber, they have a finlike design that prevents clothes from sliding. The strips are backed with a clear adhesive and are compatible with wood or plastic hangers.

Advertisement
Advertisement
Organizing 5m read
3,424

Create a Clutter-Free Home With These 10 Amazon Organizers

No matter how clean your home is, chances are, there’s an area or two overrun with clutter. Whether it’s an overflowing junk drawer or a chaotic garage, you can conquer clutter once and for all with the right organizing solutions. Amazon offers ingenious products of all kinds to help solve your biggest organizational headaches.

All featured products and deals are selected independently and objectively by the author. House Outlook may receive a share of sales via affiliate links in content.
Advertisement - Continue reading below

No matter how clean your home is, chances are, there’s an area or two overrun with clutter. Whether it’s an overflowing junk drawer or a chaotic garage, you can conquer clutter once and for all with the right organizing solutions. Amazon offers ingenious products of all kinds to help solve your biggest organizational headaches.

To make the cut, the organizers on this list had to check a few boxes. Affordable? Yep. Top-rated? That too. Durable? Definitely. Scroll on for 10 must-have organizers that’ll instantly straighten out your closet, desk, kitchen, and every cluttered corner, too.

1. REALINN Under Sink Organizer

The area under your kitchen and bathroom sinks can be a scary place full of toppled-over products, but it doesn’t have to be. Instead, invest in an under-sink organizer, such as this two-pack from REALINN. It takes advantage of vertical space without interfering with plumbing, and the slide-out shelves make it easy to grab whichever bottle you need.

The REALINN Under Sink Organizer against a beige background. The metal organizers come in a pack of two and have slide-out drawers. Pictured here is the white option but it also comes in black and gray.
REALINN Under Sink Organizer
Price: $45.99
BUY NOW

2. Yasonic Corner Adhesive Shower Caddy

Shampoos and conditioners and body washes, oh my! Showers can easily be overrun by hair and body products, so to spare yourself bottles falling off the tub’s edge (and onto your toes — ouch!), add these caddies to your Amazon cart. Their L-shape design makes smart use of corner space, and they’re made of rust-proof stainless steel, so they’ll look chic for years to come. Your purchase includes two corner caddies that can support up to 40 pounds, a well-draining soap holder, and 12 adhesive hooks to hang washcloths or razors.

The Yasonic Corner Adhesive Shower Caddy in black against a plain beige background. It comes with two corner caddies, a soap holder, and 12 adhesive hooks. There are multiple colors to choose from but pictured here is the black option.
Yasonic Corner Adhesive Shower Caddy
Price: $23.99
BUY NOW
Advertisement

3. Yamazaki Purse Organizer

Bag lovers, rejoice — there’s a quick fix for your piles of purses. This bag divider is from Yamazaki, a brand inspired by small-space living in Japan. It features eight adjustable dividers to accommodate the width of each individual bag, so it’ll keep slim clutches and oversized totes (and every purse in between) upright and organized.

The YAMAZAKI purse organizer/divider in white. The dividers are adjustable to accommodate different sized bags.
Yamazaki Purse Organizer
Price: $39.00
BUY NOW

4. TIDYME Wall Mounted Garden Tool Organizer

Do you close the garage door the second you drive your car inside so your neighbors can’t peek at the mess? You need this wall-mounted storage solution with adjustable hooks. It holds up to 300 pounds, so your shovels, brooms, garden tools, and whatever else is currently occupying your garage can be safe and organized, all while freeing up valuable floor space.

A close-up of the TIDYME Wall Mounted Garden Tool Organizer holding a bunch of different household tools including shovels, hoses, and brooms.
TIDYME Wall Mounted Garden Tool Organizer
Price: $49.95
BUY NOW
Advertisement

5. Volnamel Leggings Organizer

If you live in leggings, this ingenious hanger will be a sanity-saver. It features 10 rubber-coated clips to corral your leggings, saving valuable closet (or drawer) space. Whether you’re headed to the yoga studio or the couch, this organizer is a must.

A close-up of the Volnamel Leggings Organizer, a single hanger with 10 clips for hanging up multiple pairs of leggings.
Volnamel Leggings Organizer
Price: $9.99
BUY NOW

6. Mudeela 8-Tier Adjustable Pan Organizer Rack

A pile of pots, pans, and their lids can easily get out of control. If opening the kitchen cabinet that houses them is downright dangerous — you never know what might fall on you — or it’s nearly impossible to find the pot your recipe calls for, it’s time to rethink your setup. The solution: this eight-tier adjustable pan organizer that maximizes cabinet space while creating a home for each piece of cookware.

The Mudeela 8-Tier Adjustable Pan Organizer Rack in black. It holds pots, pans, and their lids, and takes advantage of vertical space in your cabinet.
Mudeela 8-Tier Adjustable Pan Organizer Rack
Price: $25.49
BUY NOW
Advertisement

7. Lanteful 10-Tier Shoe Rack

If there’s a growing pile of boots and sneakers in the bottom of your closet or by the front door, this 10-tier shoe organizer is an easy fix that’ll only set you back $30. It stores up to 50 pairs of adult-sized shoes and can be assembled as one tall organizer or two five-tiered racks — whichever best serves your space. Don’t have 50 pairs of shoes? It’s also useful for organizing purses, hats, and other accessories.  

The Lanteful 10-Tier Shoe Rack, which can store up to 50 pairs of adult shoes. It also has 10 hooks for hanging keys, umbrellas, bags, etc.
Lanteful 10-Tier Shoe Rack
Price: $24.99
BUY NOW

8. Diesisa Rotating Makeup Brush Organizer

Sometimes the smallest solutions make the biggest impact. For example, this rotating makeup brush organizer would clean up your exploding makeup bag in a heartbeat. Best of all? It’s super affordable. This organizer isn’t limited to a bathroom vanity, either. Consider adding a second one to your Amazon cart to tidy up your home office or crafting supplies.

The Diesisa Rotating Makeup Brush Organizer. It's white with a ribbed texture and little gold feet. There are five different compartments for storing brushes.
Diesisa Rotating Makeup Brush Organizer
Price: $9.99
BUY NOW
Advertisement

9. Spospo Water Bottle Organizer

Water bottles are a necessity. Yes, plural. You need one in your car, one on your desk, and one for every family member, too. The problem? They take up a lot of kitchen cabinet space, which is precious real estate. There’s an easy, affordable solution, though. This water bottle organizer provides a neat home for six bottles, no assembly or tools necessary.

The Spospo Water Bottle Organizer, a clear, acrylic organizer that holds six water bottles and can fit inside a kitchen cabinet for easy storage.
Spospo Water Bottle Organizer
Price: $13.49
BUY NOW

10. Pipishell Bamboo Expandable Drawer Organizer

So long, junk drawer. Whip any drawer — whether in your kitchen, bathroom, office, or otherwise — into tip-top shape with this bamboo organizer. It expands in width, ensuring a perfect fit no matter your drawer’s size, without awkward (and dust-collecting) space around the edges. It comes with removable dividers, too, so you can customize the compartment sizes for utensils, desk supplies, or makeup. Tip: To keep the organizer from sliding around inside your drawer, add a few dots of museum gel, a clear, removable adhesive.

The Pipishell Bamboo Expandable Drawer Organizer pictured against a plain beige background. It has 4 removable dividers so you can create a custom storage solution. This kitchen cutlery tray is expandable from 10.24" to 15.75" wide, 13.98" long, and 1.97" deep.
Pipishell Bamboo Expandable Drawer Organizer
Price: $21.99
BUY NOW
Advertisement
Advertisement
Home Improvement 3m read
42

No Measuring Tape? Just Reach for Your Wallet

Have you ever needed to measure something on the go, but your ruler is in your toolbox back home? Maybe you’re at the thrift store trying to determine how tall a bookshelf is, or at the local deli wondering if their foot-long sandwiches are truly as long as advertised. Whatever the case may be, here’s a quick tip that’ll help you roughly estimate the size of anything, using something you probably have in your wallet.

All featured products and deals are selected independently and objectively by the author. House Outlook may receive a share of sales via affiliate links in content.
Advertisement - Continue reading below

Have you ever needed to measure something on the go, but your ruler is in your toolbox back home? Maybe you’re at the thrift store trying to determine how tall a bookshelf is, or at the local deli wondering if their foot-long sandwiches are truly as long as advertised. Whatever the case may be, here’s…

Got a Dollar?

According to the U.S. Currency Education Program, the standard length of a paper U.S. bill is 6.14 inches, whether it’s a dollar bill, a fiver, or even a cool hundo. So if you need to roughly estimate the length of something to the nearest half-foot, you’re in luck. Grab a dollar — or several — and lay it (or them) along the item you need to measure. If all you need is a rough number, round down to 6 inches. For a more accurate reading, use 6.14 inches per dollar and multiply accordingly.

Related: How To Choose the Right Size Drill Bit Every Time

It’s also worth noting that U.S. dollars measure 2.61 inches from top to bottom. This may be helpful knowledge when trying to measure something smaller. Keep in mind, though, that this is only the case for modern currency introduced after 1929. Older U.S. banknotes measured 7.375 by 3.125 inches, though it’s highly unlikely you’d have any of those in your wallet. (They are, however, valuable collectibles.)

Advertisement

Word to the Wise

While U.S. dollars measure 6.14 inches by 2.61 inches when freshly minted, those exact dimensions may slightly decrease over time. The edges of the bill will likely wear away with repeated use, as the money gets repeatedly folded into wallets and stuffed into tills. This erosion won’t change the numbers much, but it may knock off a few decimal points.

The Dimensions of Foreign Currency

Foreign currency doesn’t adhere to the same dimensions as U.S. currency, and may be slightly longer or shorter than 6.14 inches. The Canadian dollar, for example, measures 6 inches on the nose — a perfectly round number that provides a nice template to measure off of. British pounds, however, vary in length from 4.92 inches to 5.75 inches, depending on the denomination, so using them for measurement can be confusing. At the end of the day, it’s best to stick to currencies you know the dimensions of.

Advertisement